DIY Traveler Notebook With Stamps, Watercolor Pencils, and Colored Pencils

Joy Clair Stamps

Hello everyone… Summer and traveling go together. We travel to visit relatives, to go camping, and to go road-traveling to see interesting things. If you like journaling or creating mini scrapbooking projects, then you must be familiar with traveler notebook. I like to have notebooks with me when we are on road trips. Today I would like to share with you my traveler notebook that I created with stamps, pigment and chalk inks, watercolor pencils and colored pencils.
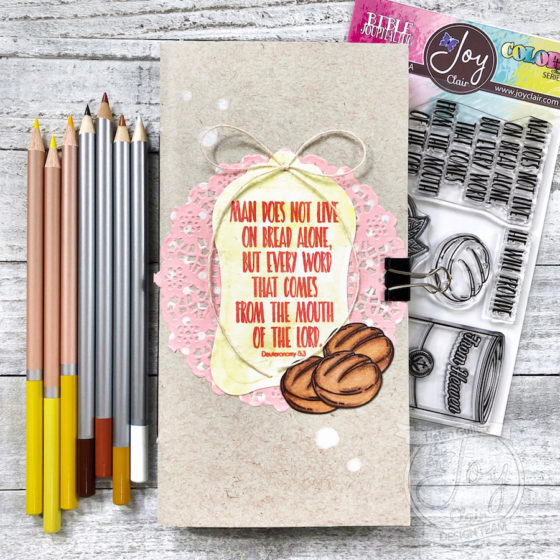
This travel notebook size is 4.25″ x 8.25″ and I made them out of heavy weigh cardstock 110 lbs for the cover, and the inside papers are mixed of copy papers and watercolor papers. I secured the pages by stitching them with some embroidery thread.

Stamp Sets I used on to decorate the traveler note book cover are 2 of the new Color By Faith Bible Journaling collection: Manna From Heaven and God’s Masterpiece. And the coloring mediums I used are Leisure Arts Premium Colored Pencils and Leisure Arts Watercolor Pencils.

I am sharing the full post with tutorial at Joy Clair Blog today. I hope you all can visit me there and enjoy it.

Thank you so much for stopping by my blog today. Have a wonderful day!

Shery’s Birthday Surprise Blog Hop

Hello everyone… Today I am joining a group of STAMPloration Girls for Shery’s Birthday Surprise Blog Hop!

Yes… it is a surprise blog hop to celebrate the amazing mom, designer and owner of the STAMPlorations, Shery Russ.

The blog hop starts at STAMPlorations Blog where you can see the peeks of the STAMPloration Girls’ projects for Shery.

I creates this CAS card using the Trendy Spring Blooms stamp set and the matching Trendy Spring Blooms – CUTplorations die set.

I cut out a piece of white cardstock using the flower dies and then I colored couple of them with Gelatos. And next, I stamped the matching flower shapes with VersaFine Clair Ink Pads (Blue Belle, Purple Delight, and Charming Pink). I added the flower diecuts on the stamped flowers with dries-clear adhesive glue. I arranged them on the corner of the card with glue and thin 3D foam tape.

And for the sentiment, I cut out a white cardstock and light grey cardstock using the word Cheers from Cheers Word Stamp & Die set. I stacked and overlapping them to look like it has shadow using dries-clear adhesive glue. Then I added it on the card with 3D foam tape.

I decorated the card with some pearl gems. My card is done.

I hope you all enjoy it and please let’s celebrate and give Shery a BIRTHDAY LOVE over STAMPlorations Blog today!

Thank you so much for stopping by my blog today. Have a wonderful and beautiful day!


I play along at:

Nautical Birthday Card

Joy Clair Stamps

July… July is here! We are half way through 2018… Yes, time flies fast,  but we can make any single moment full of fun and memorable.

Today is the first of July, that means there is a new challenge at Joy Clair blog. And this is my card for July challenge that is inspired by these fun Summer/Nautical images from Joy Clair – July Challenge.

To create the background, I started with scrabbling some of the 2 shades of blue using the Leisure Arts Watercolor Pencils on a piece of watercolor paper. Then, I blended them using a waterbrush. I dried it with craft heater.

Next, I stamped the boat from Light House stamp set with VersaFine Clair Nocturne Ink Pad. And then I colored it with white, red and blue Leisure Arts Premium Colored Pencils. I used the light blue colored pencil to add water shadow under the boat.

I stamped the sun from the Life’s Breeze stamp set with VersaFine Clair Cheerful Ink Pad. Then, I colored the sun with Leisure Arts Watercolor Pencils.

Next, I stamped the kites, bows, and strings from Life’s Breeze stamp set using VersaFine Clair Nocturne Ink Pad, and I colored them with Leisure Arts Premium Colored Pencils.

I stamped some birds from Fly With Me stamp set using VersaFine Clair Nocturne Ink Pad on the card to finish this scene background.

I cut the background panel using Crazy Double Running Stitch Rectangle Nesting Dies and I added the panel on a white card using dries-clear adhesive glue.

I stamped the birthday sentiment from Life’s Breeze stamp set using VersaFine Clair Blue Belle Ink Pad on a white cardstock, then I trimmed it into a sentiment banner. I added it on the card with 3D foam tape.

Now… it is your turn to create anything goes project inspired by the image from Joy Clair – July Challenge. The more you link up, the more changes you can win.

I hope you all enjoy this card today. Thank you so much for stopping by my blog… Have a wonderful day!


I also play along at:


SaveSave

SaveSave

SaveSave

A Nautical Masculine Card ~ You Are My Anchor

A Jillian Vance Design

Hello everyone… Today I have a nautical masculine card to share with you all. Summer is around and we love spending time at lakes and beaches. They inspire me to create this card.

I am sharing this project also over A Jillian Vance Design Blog today. I hope you all will visit me there.

First, I cut out a piece of blue cardstock with the Diagonal Stripes Cover Plate Die using my Gemini Jr. machine, then I added it on an A2 white card with dries-clear adhesive glue.

I stamped one of the sentiments from the You Are My Anchor Stamp Set with Rockin Red – CP Ink Pad on a white cardstock, trimmed it into a sentiment strip, and then I added on the card with dries-clear adhesive glue.

For the anchor, I cut out a piece of Silver metallic cardstock using the anchor die from the Anchors Aweigh Die Set. I love how the texture pop up. I added the anchor on the card with 3D foam tape.

I embellished the card with some of the Lemon Yellow Opaque Sequins.

I hope you all enjoy this card today. Thank you so much for stopping by today. Have a fabulous day!

A Jillian Vance Design products used:


I link up at:


Mixed Media Card ~ With Love Always

Graciellie Design

Hello everyone… Today I have a mixed media card with digital stamp set, acrylic paints, gesso, distress oxide ink, distress ink, and watercolor crayons.

I am using the new Together digital stamp set from Graciellie Design. I started with printed out the flower and sentiment set after I resized them.

I colored the flower with Stabilo Woody Watercolor Crayons and waterbrush. I picked up the colors directly from the crayon with the waterbrush. After that I added some glitter with Spectrum Noir Clear Sparkle Brush.

I dried the image with crafter heater. And then using my Gemini Junior machine, I cut it with ODBD Double Stitched Rectangles. I also cut out the sentiment with ODBD Double Stitched Pennant Flags Dies.

I added some gold splatter on the background by flicking the gold crayon pigment and waterbrush. I dried the panel with craft heater.

For the background panel, I started with added some acrylic paint with rubber brayer on a piece of watercolor paper. I used light blue, yellow, and orange paints from my stash. After the paints dried, I added some white gesso with finger to mute the colors. I dried it with craft heater.

Using the distress blending tool, I added some of the Distress Oxide Vintage Photo ink all over the panel, then I spray with some water. I let it sit for several second, and I dabbed it off with paper towel for extra texture. I cut out the panel to fit as the mat on a 5×7 card base. And after trimming it, I added some Distress Vintage Photo ink with blending tool around the edges of the panel for extra shadow.

I added the background panel and the flower panel on the card with Scrapbook Adhesive E-Z Runner Grand. And then I added the sentiment pennant flag on the card with 3D fun foam and dries-clear adhesive glue for extra dimension.

To embellished the card, I added some white pearl gems and some natural burlap twine.

I hope you all enjoy this post today. Have a wonderful day and thank you so much for stopping by!


I link up at:

Simon Says Bright and Cheerful