Daily Thoughts Mixed Media Card

Precious Remembrance New Stamp Release Blog Hop and Giveaway

Hello everyone… Happy Saturday and Welcome to Precious Remembrance New Stamp Release Blog Hop and Giveaway. It is their first new release of this year and we are so glad that you are here to celebrate!

We are showcasing the the new stamp set, Daily Thoughts on our projects for this blog hop. It is a fun and fabulous stamp set to create with. It is full with retro look images, hand-lettering and positive vibe sentiments:

Daily Thoughts - Stamp Set

And for this blog hop project, I created a mixed media card using this Daily Thoughts Stamp Set. First time I saw the cassette tape image, it reminded of my Junior High School year! Yes… I grew up with cassette tapes! LOL! 😀 😀 😀

Precious Remembrance Shop New Stamp Blog Hop and Giveaway - Daily Thoughts Mixed Media Card

First I created the background. On a black heavy cardtock, I stamped it using white acrylic paint and plastic bubble wrap. When the paint dried, I used a Distresser Tool to distress the edges of the page.

Next, I sprayed some homemade gold paint spray on a white cardtock, dried with craft heater, and cut it with one of the Rectangles Dies.

I added both background panels on a side-folded white card with strong liquid adhesive.

Precious Remembrance Shop New Stamp Blog Hop and Giveaway - Daily Thoughts Mixed Media Card

On a watercolor paper, I added the inks from Kaleidacolor Bouquet Ink Pad using brayer tool. First, I roll the brayer on the ink pad several times to make sure it pick up the inks, and then I sprayed it with the Ink Potion No.9 spray, and rolled it on the cardstock. And the magic happened! I love the distress and watercolor paper texture show up on this panel after the inking process.

I dried the inked cardstock with craft heater. And after that using my Mini MISTI, I stamped the Cassette image on in with Memento Tuxedo Black Ink Pad. I stamped it several times to get a crisp image. Next, I fussy cut it with micro-tip scissors. I added on the card with 3D foam tape for an extra dimension.

For the sentiments, I stamped them on a white cardstock with London Fog Memento Dew Drop Ink Pad. Cut them down into paper strips, and added them on the paper with strong liquid adhesive.

I finished this card with some triangle metal studs I had in my stash. And my mixed media card is done!

Daily Thoughts - Stamp Set 1

Before you go… we have a GIVEAWAY! To enter the giveaway…you can simply leave a comment to the shop’s blog post and each designer’s blog and show us some love! And here are the full list of Blog Hop Day 1 to see the details of each designer’s project showcasing the new Daily Thoughts Stamp Set:

Precious Remembrance Shop

Erica Thompson – Guest DT-

Lisa Elton

Greta Hess

Helen Gullett –> You’re Here

You’re next stop –> Rosemary Dennis

Kelly Lunceford

One lucky winner will be chosen randomly. This Giveaway is open until January 24, 2018 Midnight EST. The winner will be announced at the shop’s blog & social media links (Facebook & Instagram) – follow us to get updated. And…to keep updated with our projects, join us on our:

Facebook || Pinterest || Instagram || Youtube

And….I have a special coupn code for you to get 10% off. This coupon is good until January 31, 2018. Use this code: DTHELEN10 on your order of $30 0r more. Valid for stamp purchase only. You’ll love all the stamps at Precious Remembrance Shop!

I hope you all enjoy it and be inspired. COME BACK AGAIN tomorrow to see another new product release from Precious Remembrance Shop!

Thank you so much for stopping by my blog today 🙂 Have a fabulous day!


I play along at:

Take It Make It Challenge: January

Anything Goes Challenge #318-#319

Simon Says: Add A Sentiment

SaveSave

SaveSave

SaveSave

SaveSave

SaveSave

SaveSave

SaveSave

SaveSave

SaveSave

SaveSave

SaveSave

Thursday Coffee Break: Coffee Card Set With Joy Clair

Coffee Loving Cardmakers

Hello everyone… I am back today with some coffee card set that I created with I create using 4 stamp sets from the Joy Clair Coffee stamp collection. They are one of the Coffee Loving Cardmakers blog hop Super Sponsors.

Thursday Coffee Break: Coffee Card Set With Joy Clair

Stamp sets I used on these cards are Coffee Lovers Stamp Set, Coffee Quotes Stamp Set, Christmas Coffee Stamp Set, and Christmas Cocoa Stamp Set.

It is also a great way to stretch your seasonal stamps and use them for different occasions. If you have stamp set with general cups like the ones from Christmas Coffee Stamp Set, and Christmas Cocoa Stamp Set, you can use the cups and mix them up with sentiments from other stamp sets. For example on these cards, I mixed them with the sentiments from Coffee Lovers Stamp Set and Coffee Quotes Stamp Set.

Come over to the Coffee Loving Cardmakers blog today to take a little break with me and your favorite coffee/tea/cocoa drinks to read the details how I created these cards.

THANKS A LATTE for stopping by today! Have a wonderful day!

SaveSave

One Layer Watercolored Card With Get Well Wishes

Joy Clair January New Release Blog Hop

Joy Clair New Release and Design Team Blog Hop

Hello everyone… Welcome to Joy Clair January New Release Blog Hop. Today you will be inspired by the projects from the team showcasing all new 13 stamp sets of Everyday Life collection and Color By Faith collection. And I am sharing a one layer watercolored card with Get Well Wishes stamp set.

Check it out, isn’t this Get Well Wishes stamp set super adorable? You can build up any cute scene and send love through your handmade card using these images.

First, I stamped the images to build the background scene on a piece of watercolor paper using Versafine Onyx Black ink pad and Mini MISTI.

One Layer Card With Get Well Wishes

I heat set the ink with craft heater, although you do not actually need to dry it with craft heater becuase this ink dries quickly, permanent and great for watercoloring project.

I colored the images with watercolor pencils and watercolor brush pen. Simply as that. And once the images dried, I cut it out using one of the stitching rectangle dies from STAMPlorations.

I added the panel directly on the front card with dries clear liquid adhesive glue. And my card is finish 🙂 It is one of the quick way of creating cards. I hope you all are inspired today to create your own handmade cards and share the joy with others.

JC_GIFTCARDS

Before you go… don’t forget to stop by at each designer’s blog to see their projects and leave comment on each blog post for a chance to win the giveaway prize – a $25 Gift Card – to Joy Clair store!!! Here’s the full list of participants:

Joy Clair Blog

Martha Lucia Gomez

Angie Cimbalo

Nicole Winslow

Andrea Bjork

Jenny Fruchey

Monica Maier

Kerry Urbatch

Helen Gullet –> You’re Here

You’re next stop –> Donna Idlet

Ceal Pritchett

Lindsay Andreon

Let’s have fun blog hopping and get inspired! THANK YOU so much for stopping by today. Have a wonderful day!

SaveSave

SaveSave

SaveSave

SaveSave

SaveSave

SaveSave

Magnifycent Friend Shaker Card

A Jillian Vance Design

Hello everyone… How’s your day? It’s been snowing in our town for 3 days! We got snowed in and school got canceled today. And do you realize that Valentine’s Day is less than a month away? And today I have a fun Magnifycent Friend Shaker card to share with you.

Magnify-cent Friend Shaker Card A Jillian Vance Design

My daughters go to school and they always have class party for Valentine’s Day and they also always need treats. I mostly would send in bags of treats for their friends. But this time, I am making these shaker cards for them to write and give to their friends.

When I mass producing cards, I always use clean-and-simple style. I created these cards using the I Spy Magnifying Glass Dies Set, I Spy Love Stamp Set, and Scarlet Satin Sequins from A Jillian Vance Design. You can check out my full post on how I created this card on AJVD Blog today.

THANK YOU SO MUCH for stopping by! I hope you all stays warm and safe… have a wonderful day.


I play along with these challenges:

Challenge #124 Love

Challenge #316 – #317 Anything Goes


SaveSave

SaveSave

SaveSave

SaveSave

SaveSave

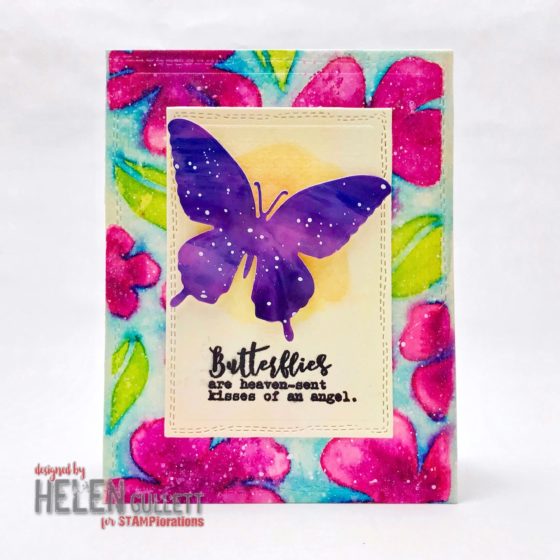
Butterfly Floral Mixed Media Card

CUTplorations January Challenge Reminder

Hello everyone… Butterfly is one of our favorite critters that we can find around the area where we live. I cannot wait for Spring 🙂 Butterflies are heaven-sent kissed of an angel… don’t you agree with that sentiment? And today I have a butterfly floral mixed media card to share with you

Butterfly Floral Mixed Media Card CUTplorations January Challenge

I created this card inspired by this snowy scene and colors from photo inspiration from CUTplorations January Challenge:

STAMPlorations - January 2017 CUTplorations Challenge

I started to create the background by tracing the Bold Florals ARTploratons Stencil on a piece of Arteza Watercolor paper with hot pink Tombow Dual Brush Pen. Then, I colored the inside of the flower and leaves with 2 shades of pink – purple for the flower petals, and 2 shades of green for the leaves. Using a small watercolor brush, I blended the colors and kindda like the bleeding effect.

Next I fill the white space with light blue Tombow Dual brush pen and also blended out the color with small watercolor brush.

I dried the watercolored background panel with craft heater. Then I added some white acrylic paint on it using fan paint brush. I dried it again. And last step I sprayed some of the Frost Sheer Shimmer Spritz to add the extra sparkle and frost look in the panel. I dried it right away with craft heater becuase I did not want the ink from Tombow Dual Brush Pens reacted too much with this shimmer spray. Check out the detail on the picture below… Don’t you love the shimmer frosted look on it? 🙂

Butterfly Floral Mixed Media Card CUTplorations January Challenge

I cut out the watercolored panel with the largest die from Crazy Double Running Stitch Rectangles Nesting Dies and I added it on a white top-fold card base with Xtreme Tombow Adhesive.

Next step is I created the second panel of this card. It is pretty simple. I simply added some yellow and orange watercolor washes on a piece of Arteza watercolor paper. I dried it with craft heater and then I stamped the sentiment from Trendy Butterflies 2 Stamp Set with Versafine Onyx Black using Mini MISTI. I cut it out with the smallest size of the Crazy Double Running Stitch Rectangles Nesting Dies and then I added it on the card with Xtreme Tombow Adhesive.

Butterfly Floral Mixed Media Card CUTplorations January Challenge

Last step is the butterfly. I grab a photo glossy paper, Eggplant Alcohol Ink, and Alcohol Ink Blender to create an alcohol ink background. Then I added some white acrylic paint splatters on it and set it aside to dry for a while. It is not that long of waiting. The acrylic paint dries quickly and we also cannot use craft heater to dry the glossy photo paper, becuase the heat will ruin the paper. Trust me, I learned it.

Once the paper dried well, I cut it out with the solid butterfly die from Flutter Zen 1 Layering Dies. I added it on the card with 3D foam tape for extra dimension to the card. And the card is done.

Butterfly Floral Mixed Media Card CUTplorations January Challenge

I hope you all enjoy this card and are inspired to create a project. Come over to see more of inspirations from the CUTplorations Challenge Team on STAMPlorations Blog today. You have plenty of time to play along with this January challenge. Don’t forget to read the rules so you will be eligible to have a chance to win the prizes. I cannot wait to see your projects 🙂

THANK YOU So much for stopping by my blog today. I hope you all have a fabulous day!


I play along at:

Never Ending Anything Goes

January Challenge – Theme and Sketch

Challenge #316 – #317 Anything Goes

January Challenge

January Mixed Media Challenge

SaveSave

SaveSaveSaveSave

SaveSave

SaveSave

SaveSave

SaveSave

SaveSave

SaveSave