Wise Men Still Seek Him

Welcome to the Joy Clair November Challenge! This month we have a new Photo Inspiration and Color Combo for you to create projects this month.

joyclair-nov-challenge

For your creation you can use almost three colors from the board and/or use the photo as theme You will have the entire month to participate with unlimited creations. Just keep in mind that:

  • all projects needs to be new
  • not back linking
  • include the link to Joy Clair Challenge in your blog post
  • you can enter as many time as you want
  • using Joy Clair products is an optional, but if you have them, we wold love to see them on your creations, too 🙂

The random winner will receive a $25 gift card from Joy Clair Store and will be announce on November 30th, 2016 on Joy Clair Blog!

And here’s my take on this challenge. I am inspired by the color combo and those pompoms 🙂 I used the color combo to create the night sky scene with Distress inks and heat-embossed the stars with White Embossing Powder for resist technique. And the twines are from Doodlebug – Christmas Collection that happen to have the same color combo 🙂

joyclair-nov-challenge-helen

The three wise men and city silhouette images are from new stamp from Joy Clair stamp – Three Wise Men. I stamped them with Versafine Onyx Black, and added some Clear Embossing powder, then heat set them with my Craft Heater. Then I fussy cut them just the top of the panel to make it look like they are partially die-cut 🙂 Then I layered all the panels, overlapping each other to create the scene. Last step, I added them on the card with 3d foam tape for some dimension.

So… Come back tomorrow for the full reveal of the new stamps release blog hop! To link up your creations and check out more inspiration for the challenge from team at Joy Clair blog! Can’t wait to see your projects for this challenge!

THANK YOU for visiting me today and have a fabulous day!

ODBD November New Release Blog Hop & Giveaway

November is here and we are just getting so close to Christmas! I have been working on cards almost every day to reach my goal before the end of November 🙂 And today I am sharing more Christmas cards with Our Daily Bread Designs.

First, I would love to share a great news to share with you all… starting this month, I am designing for Our Daily Bread Designs! I am so thankful and excited to create with this amazing and talented ladies in ODBD team and share projects with you using ODBD products. Our Daily Bread Designs is a stamp/die/crafting company that provides Christian, Scriptures, God-Focus, inspirational theme stamps, custom-dies, and designer papers. We, hope to continue inspiring to create with faith, and sharing the love of God through our handmade cards, and other DIY projects, too.

odbd design team member

Today, ODBD releases new stamps, die sets, paper collections. And… they is giving away 3 gift cards to the store. Keep reading… 🙂 and visit ODBD November New Release Blog Post to read more about the new release and how you can save money on the Bundles and get free shipping!

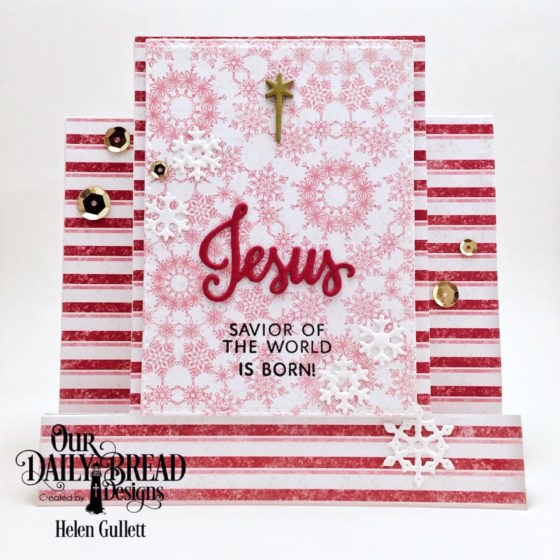
For this new release, I created 2 cards. On my first card, I use the Jesus Loves You Stamp/Die Duos, Snow Crystals dies, Snowflake Season Collection Paper Pad, Fun & Fancy Folds – Center Step Card, Double Stitched Rectangles Dies, and Rectangles Dies:

odbd-nov-new-release-jesuslovesyou-hg1

Using my WRMK Evolution Advanced, I die-cut and embossed the pieces. For the word Jesus and the Star, I die-cut them 5 times and stacked them together with glue pen to create thicker chipboard. Sentiment I stamped with Versafine Onyx Black on one of the beautiful Snowflake Season Collection papers. I finished the card with some gold sequins.

odbd-nov-new-release-jesuslovesyou-hg2

The ODBD dies are not online for die-cutting, but also for embossing and stenciling. Check out the details on the die-cuts after embossing:

odbd-nov-new-release-jesuslovesyou-hg3

odbd-nov-new-release-jesuslovesyou-hg4

On my second card, I use the new Snowflake Season Collection Paper Pad, Merry & Bright clear stamp,  Snow Crystals Dies, Double Stitched Rectangles Dies, and Rectangles Dies:

odbd-nov-new-release-merrybright-hg1

I diecut a black cardstock with the double stitched rectangles and rectangles dies to create the chalkboard window. Then I cut out a piece of black cardstock for the chalkboard background where also I stamped and heat-embossed the light strings from Merry & Bright clear stamp set using Ranger White embossing powder. After that, I colored the light bulbs with my Prismacolor Premier Colored Pencils.

odbd-nov-new-release-merrybright-hg2

Aftercoloring, I added some White Archival ink on the panel with sponge to create the chalkboard look. Then I finished the card with some clear gems.

Here are the new stamps, die sets and paper collection that I used on my cards today:

jesus-loves-you-ics65-231

merry-bright-ics64

christmas-lights-dies-cbd234

snow-crystals-cbd230

christmaspinkpad_cover

GIVEAWAY ALERT!

Three randomly selected winners will each receive a $25 Gift Code to the ODBD Website just for commenting on the Design Team cards! You have until November 2, 2016 at 9:00 p.m. EDT to leave your comments on the Designers Blogs for a chance to win! The Winners will be posted on the ODBD Blog on November 3rd, so be sure to check back there to see if you won!

Design Team members have created amazing projects to inspire you, visit and leave them some love on their blogs:

Cathy * Dawn * Lori * Robin * Julie * Sandee * Anita

Helen * Angie * Chris * Grace * Lisa * Sabrina * Kathy * Diana

I hope the cards today will give you some inspirations to create handmade Christmas/Holiday theme cards. Thank you so much for visiting me today and have a fabulous blessed day!

Watercolored Happy Holiday Card

Hello crafty friends, today wanna share another Christmas card with you at Joy Clair blog. I am using the one of the new release stamps, Merry Christmoose Clear Stamp. This stamp set is super adorable!

6a01bb085e6267970d01bb09427d0e970d-500wi

I created the background with my Tombow Dual Brush pens. I scribbles the red, yellow and blue on a piece of clear acetate and sprayed with some water. Then I dipped my watercolor paper in it. Gently I moved my fingers on it to make sure the surface of the card would be covered evenly with the colors.

Watercolored Happy Holiday with Joy Clair Stamps & Tombow Dual Brush Pens

Then I lifted up from the plastic acetate, and I used paper towel to remove some of the colors on the edges. I dried it with my craft heater because I did not want to wait 😀 But also drying with craft heater will make sure that my watercolored panel is dry well before stamping.

Next step is I stamped the tress on the panel, one is bit lower and other bit higher becuase I wanted to add some snowy hills on the card. I stamped the images with Versafine Ink Pad with MISTI couple times to give extra bold and dark for the silhouette effect. I stamped the sentiment also with the same ink and did it couple times. And then I heat set the stamped image again with my craft heater.

I added some snow on the trees with Uniball Signo White Gel Pen. Randomly I added some snow on the branches, imaging the snow will fall and sit on the branches. Then I decided to add some extra snow on the background with some white paint splatters using toothbrush and big round paint brush for bigger drops.

Watercolored Happy Holiday with Joy Clair Stamps & Tombow Dual Brush Pens

For the snowy hills, I cut out white cardstock shape like small hills and then using a make up sponge, I added some Broken China Distress Ink on them. Lighter on the middle and darker on the edges. Then I added them on the card with 3d foam tape.

My card is done 🙂 I hope this will inspire you to create more Holiday handmade cards to share the joy with your friends and family.

Don’t forget you still have time to play along with Joy Clair – October Challenge to win a $25 gift card to the store!

THANK YOU for visiting today and have a fabulous day!


I am playing along with:

Word Art Wednesday

Challenge Weeks #254-255 – Anything Goes

Simon Says Stamp Wednesday Challenge Blog

Simon Says: Anything Goes

Last Minute Cards For WCMD 2016

It is a week before the end of October! I finally had some times to make some cards for the WCMD challenge at Stamp Nation on the past weekend. Today, I would like to share them with you 🙂

I did not play with all off their challenges, but I love seeing all the inspirations from the design team, guests DT and participants. They are so many creative people there! So, here are my cards.

Stamp Nation WCMD Challenge 1

Challenge #1 – Where In The World. We were challenge to create a card inspired by our own country. I am from Indonesia and batik is our national fabric pattern. So, I created a batik card for this challenge.

On my card, I heat-embossed the leaves from Hero Arts – Grateful Leaves stamp set that I got from a2z Scrapbooking store (you can get 15% off with code Helen15 when you put $25 on order or more). After that I crumbled the paper and added the colors with watercolor paint. This is one of the easy ways of creating a batik look background that I have tried. I cut the background panel in 2 different sizes, I glued the larger one on top of the card base, then the bottom smaller size. That leave the middle card base free for sentiment. I stamped the sentiment from the same stamp set with Versafine Onyx Black ink.

Challenge #2 is Globe Inspired. We were challenged to create a card inspired by these globes:

And here’s my card:

Stamp Nation WCMD Challenge 2

On my second card, I use the Color My World stamp set from Honeybee Stamps. The globe die set is from Echo Park Paper. I colored the flowers and globe using Distress Mini ink pads with watercolor brush. I watercolored the background with watercolor paint. And finished the card with stamping the sentiment from the same stamp set with Versafine Onyx Black and added some glitter on the globe and sentiment with Wink of Stella.

My third card is for the Challenge #6 – Flag Inspirations.

I did not see my flag on the picture but my card today is inspired by my country’s flag:

Stamp Nation WCMD Challenge 6

It is simply CAS, red and white. I used the red card base from American Crafts. I stamped the flower and sentiment from Beautiful Bloom – Sweet Rose stamp set (Kennedy Grace Creations) on white cardstock with Versafine Onyx Black, then fussy cut them, and added on the card base with 3D foam tape.

Stamp Nation WCMD 2016 - Challenge 9

The fourth card is inspired by Galaxy Technique, the Challenge #9. This is one of the new techniques that I learned recently and LOVE it. Stamp I used is Away In A Manger from Joy Clair Stamps. The background I created with Distress Inks and using make up sponge I added them on a white cardstock. I added some white paint splatters on it, too. I heat-embossed the sentiment and the big star with Ranger – Princess Gold embossing powder.

Snowflake Sky - Christmas Greetings

For the last challenge, is Challenge #12 – All About The Weather. My card is inspired but the winter and snowy days here in Ohio. I created this card using the Snowflake Sky and Snow Crystals dies from one of the Pre-Order November New Release Bundles from Our Daily Bread Designs. I embossed the Snowflake Sky background die on Canson watercolor paper and diecut it with the frame die from the same die set. Then I added watercolor paints on it. The silver glittery snowflakes are from the Snow Crystals dies. The sentiment is from Jingle Bell Time stamp set.

That’s all the cards I created for those challenges at Stamp Nation and I hope they inspire you to create more handmade cards! THANK YOU so much for visiting me today!

Thursday Coffee Break: Warm Wishes

clc-thruscoffeebreak-oct20-a

Good morning coffee loving crafty friends, this morning on Coffee Loving Cardmakers blog, we are taking a break with some sponging, fussy cut and splatter techniques to create a clean-and-simple card. And today, I am using the Precious Remembrance Shop – Coffee Love Stamp Set and ADORNit – Basic Paper Pack.

clc-thruscoffeebreak-oct20-b

Using Versafine Onyx Black, I stamped the sketchy coffee cup on a piece of yellow washed patterned paper from ADORNit – Basic Paper Pack. Then I sponged the Vintage Photo Distress Ink using a make up sponge all around the cup. The edge is darker than the middle for some depth and I left the middle un-sponged to keep the texture on the patterned paper.

I fussy cut it with micro-tip scissors once I got the shadow I wanted 🙂 I stamped the sentiment in the middle with Versafine Onyx Black on the cup. Then I tied up some orange and yellow twine from American Crafts.

On the card base, I stamped the border that comes from the same stamp set with Versafine Onyx Black. And then I added the cup on the card with 3D foam tape. I decided to added some watercolor splatters around the cup and finished it with some clear gems.

I hope you enjoy this simple card today! THANKS FOR VISITING!


I am playing along at:

Challenge Weeks #252-#253 – Anything Goes