Joyful Holiday Blessings

Today I am playing with Virginia’s View Challenge #11 – Clean Slate. I really like her challenge that give us so many inspirations to create. I hope you wanna check our Virginia’s challenge and play along 🙂

This month main theme is Clean Slate. She provides these inspirations:

IMG_1732.JPG

Aren’t they pretty inspirations? I am thinking of Christmas cards when I saw them 🙂 So, I created not only one but 2 cards:

Joyfull Holiday Blessings 1

Joyfull Holiday Blessings 2

I found the holly leave embossing folder at Hobby Lobby. Using my WRMK Evolution Advanced embossing machine, I embossed the front cards. The first card, I stamped and embossed the sentiment, then run it through the machine. And the second card, I run it through the machine and then added the stamped, heat embossed sentiment on a green cardstock.

Here are the close up on the sentiment, I used Winnie and Walter – The Big, The Bold and Blessings, Ranger Gold Princess Gold Embossing Powder and heat set it using my Craft Heater.

IMG_1724.JPG

IMG_1730.JPG

I finished the cards with twine and die cut poinsettia flowers (from Lori Whitlock) that I cut using my Silhouette Cameo.

Do you start early making Christmas cards or later?

Snow Thank You Card

Today is my day sharing my project at Stuck On You Sketches Blog for their new Die Cut Challenge. This time theme is to use any SNOW die cuts on your projects. Don’t forget to link up your project (s) here.

And I decided to make a card for a friend 🙂

IMG_4563

I used a A2 card for the base. For the mat, I cut a piece of White Daisy cardstock (3.75″ x 5″) and then I embossed it using Chevron embossing folder. I added the felt snow flake die cut on the card. The thank you banner is from For A Friend stamp set that I stamped on a piece ofWhite Daisy cardstock using Crystal Blue and Glacier Exclusive Ink Pads.

IMG_4530

Thank You for stopping by today!

Scrapping Everyday Miracles – January 2015 Challenge

Welcoming the New Year, Scrapping Everyday Miracles has 3 new challenges on their blog for this month. The Design Team have created lots of inspirations for you to play along with us this month, check them out here. And every day, the team also will be sharing some tips, techniques, and encouraging posts on the blog.

You have until the end of January to play along with their challenges, read all the challenge rules and link up your project here.

The Layout Sketch Challenge

The Card Sketch Challenge

The Bible verse Theme Challenge – 2 Corinthian 5:17

“Therefore, if anyone is in Christ, the new creation has come: The old has gone, the new is here.”

And this month, I play along with the Card Sketch challenge. Here’s the card I created:

IMG_4368

I embossed the card based using my WRMK Evolution Advanced and CTMH Quatrefoil Embossing Folder. Using Watercolor brush, I pick some Hollyhock Exclusive ink from the ink pad lid and splatter it on the card randomly while I squeezed the water out. Have to be very careful to do this because you do not want the water to flow too much out of the brush and will soak your card.

Then I let the card based dry on the side. While it was drying, I cut a piece of White Daisy cardstock for the tag using my Silhouette Cameo and punch the bottom of the tag using Scallop Border Punch. Then tie up a piece of Baker’s twine I had in stash (I forgot the color’s name of it… sorry! But it is grey and white).

IMG_4369

For the flowers, on White Daisy cardstock, I stamped the flowers from The Big, The Bold and Extras set from Winnie & Walter using Hollyhock and Blush (retired, replaced with new pretty color, Pixie) Exclusive Ink Pads, then the leaves using Pear and Topiary Exclusive Ink Pads. Then I cut them using micro-tip scissors. I arranged them on the tag and glued them using glue pen. Then added some Sparkle Clear Assortment gems. From the same stamp set, I stamped the banner and sentiment using Black Exclusive ink pad. I added the banner on top of the flower cluster using 3D Foam Tape.

Before adding the tag on the card base, check to make sure the splatter ink is dry completely, if not, you can use any embossing heater to dry it, like I did using my Craft Heater. When it was completely dry, I added the border paper and arrow that I cut out from Heartstrings paper packet (lovely paper for this theme). Final step is to add the tag on the card. I glued the twine using a little bit of Liquid Glass (all-purpose liquid glue, dries clear, strong – best glue I ever used!) so it stays on the card, not flapping around. And my card is done 🙂

THANK YOU so much for visiting today!

Watercolor Wreath Christmas Card

9 days ’till Christmas! Can you believe that? I am a little behind with sending Christmas cards this year… but almost finish today! 😀 A lot of writing for sure, but my oldest is helping with writing cards this year, that is fun 🙂   Making Christmas cards are super fun for us. And today, I would love to share a card I made to play along with Curtain Call Inspiration Challenge, Candy Cane.

I am inspired by the Candy canes and wreath. I used couple retired products from CTMH for this card. Oldie but still goodie 🙂

For the base layers, I used Sparkle and Shine paper packet that one side of the pattern is candy cane and the other is polkadots. I cut 2 sizes of squares, 5.25″ (candy cane side) and 4.75″ (polkadots side) for base the layers. Then on a watercolor paper (3.25″ x 3.25″), I stamped the wreath branch with Chocolate exclusive ink pad and sprayed with some water. And then I stamped the berry dots with Ruby exclusive ink pad and sprayed with some water, for some watercolor effect. With the same technique, I stamped the sentiment in the middle of the wreath with Olive exclusive ink pad.

noel-winter-berry-wreath-curtaincall2014-hmg

I added some natural baker’s twine and some pearl adhesive gems on it. Then added it on the card using 3D foam adhesive. I love how the watercolor effect using dye inks turned out 🙂

Noel - Watercolor Winter Berry Wreath

Thanks for stopping by today! Have a merry December!

Christmas Cards: Watercolored, Distressed and Blinged

I am working on my last Christmas cards this week… I thought I had enough but so thankful to know that there were some new friends and mission partners God has brought into our life this year! We are rejoicing!

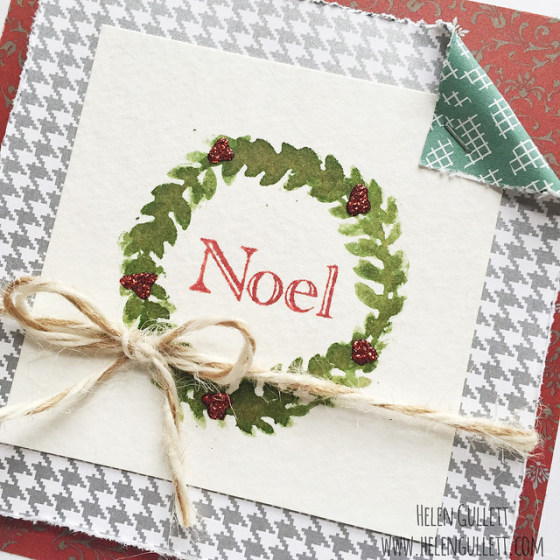
Today I would love to share couple of the cards I made using some retired products from Close To My Heart. Both cards are 5.75″ square.

Card 1 I used some of Sparkle and Shine paper packet and I distress the edge of the second layer paper using Edge Distresser. I really like this distress tool, easy to use and quick way to create torn edges 🙂 Then I tucked one of the corners and secured it with Mini Stapler.

noel-wreath-card-sss-1a

On a square piece of watercolor paper I stamped the wreath using Olive exclusive ink pad. The wreath I actually created using a leaf brach from It’s The Little Things set (SOTM November 2014). I drew a thin circle as guide and stamped the leaf repeatedly after I sprayed with little water to give the watercolor effect.

With the same technique, I stamped the Noel sentiment in the center of the wreath using Ruby exclusive ink pad. Then I embellish with some Studio G red glitter glue, I found it at Walmart scrapbooking area. I set it aside to dry completely before I added the twine and glued it on the card.

noel-wreath-card-sss-1b

This card I link up this card at Virginia’s View Challenge #10, All Things Distressed

And this second card, I link up at Simon Says Stamp Wednesday Challenge, Bling It On. I used the same products and technique to create this card. A little bit different design.

noel-wreath-card-sss-2a

For the wreath, I only stamped the leaves one layer and then I added some red adhesive gems on the wreath. Then I add the baker’s twine on top of the card.

noel-wreath-card-sss-2b

Thank you for stopping by today and have a merry December!!!