Clean And Simple Card | Grateful For You

Hello everyone… September is almost gone by, Fall season is almost here. Inspired by my favorite season, I created this clean and simple card.

On my clean and simple card today I use newly released stamp set, Fall Greetings, Rinea products, and coloring with Leisure Arts Double Ended Markers.

I tried ghosting look technique with Rinea Ghost Ink Pad and one of the Autumn Foiled Papers Variety Pack to create the circle background.

I stamped one of the leaf branches from the Fall Greetings stamp set with Rinea Ghost Ink Pad on the mocha side of the glossy foiled paper. Let it dried for about a minute, and then I sprayed it with 70% rubbing alcohol and I wiped it off right away with paper towel. I like the distressed look on the foiled paper. And then, I cut it with one of the Divinity Designs Pierced Circles Dies and I added it on a white card with double-sided tape.

I did the same stamping step with the sentiment on a piece of Ebony/Glossy Solid Foiled Paper. After that, I trimmed the foiled paper into sentiment strip and added 3D foam tape on the back of it.

For the foliages, I stamped the leaf braches and berry branch on a white cardstock with VersaFine Clair Ink Pads (Pinecone and Green Oasis).

I dried the stamped images with craft heater and then I colored the leaves with the Leisure Arts Double Ended Markers and water brush that turn the marker inks into watercolor paint. I dried the watercolored image with craft heater and then fussy cut them with micro-tips scissors.

I stacked the brances together into a bundle and secured them with permanent adhesive glue, and then I tied it up with natural twine ribbon.

I added the brances on the card with permanent adhesive glue and then I added the sentiment on it with the same glue.

I hope you like my card today. For more inspirations, head over to Joy Clair blog. THANK YOU so much for stopping by!

Coffee Loving Cardmakers and Divinity Designs Collaboration | Coffee, Coffee, Coffee…

Hello everyone… Yay for Friday! Welcome to the Coffee Loving Cardmakers collaboration blog hop with one of our super sponsors, Divinity Designs. There are lots of inspirations and prize to win! Let’s get hopping!

This blog hop starts at Divinity Designs blog and Coffee Loving Cardmakers blog. And you should arrive from my coffee loving friend, Annette. I am pretty sure that you all are inspired by her amazing coffee projects.

And here are my coffee cards to share with you all today. On both of my cards, I used the newly released Perk Up (Stamp/Die Duo Set) and also their other coffee/tea collection dies – Beverage Cup Dies, and Cups and Mugs Dies.

On this first card, I used the  with Leisure Arts Double Ended Markers and waterbrush. I used smooshing technique to create the watercolord background. I stamped the images on the watercolored paper with VersaFine Clair Pinecone Ink Pad. After that, I cut it using the Pierced Rectangles Dies. I added the cut out fames and paper on the card with 3D foam tape and permanent adhesive glue.

I cut out the cup and distressed the cup sleeve with sanding box. I added the cup and coffee die cuts on the card with permanent adhesive glue.

I stamped the sentiment, with VersaFine Clair Tulip Red and I added on the card with 3D foam tape.

This second card is no-stamping card, totally all dies. I used the Pierced Rectangles Dies, Layered Laceys Ovals Dies, and also the gorgeous Latte Love 6×6 Paper Pad for the background.

BLOG HOP and GIVEAWAY

For your chances to win to win a $25 Divinity Designs Gift Code… Simply visit all participants’ blogs and leave comments along the way. Commenting will be open until Friday, September 27th at 11:59 PM Pacific. A winner will be announced on the Coffee Loving Cardmaker’s blog the following week. Winners will be picked from across all participating blogs, the more you comment, the more chances to win.

And your next stop is my coffee loving friend, Lisa. She has fabulous projects to share with you!

Thansk a latte for stopping by my blog today. Have a fabulous day!

Coffee and Sunshine

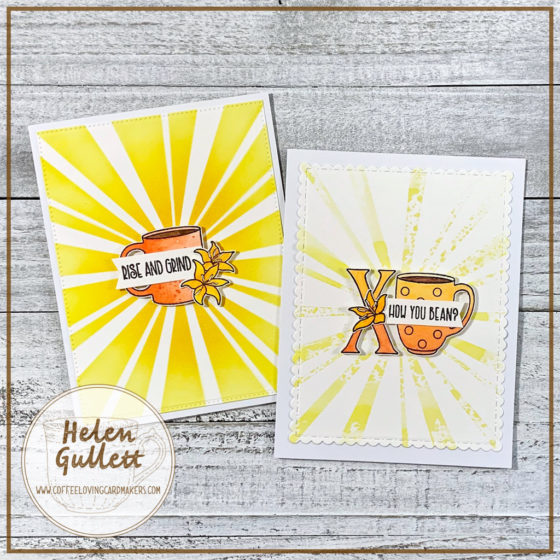
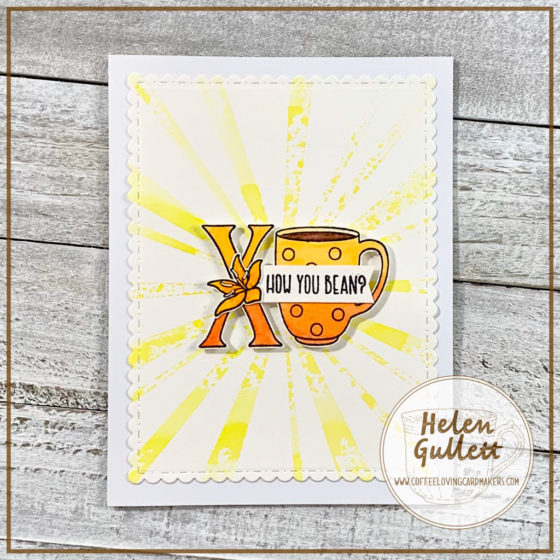
Hello hello hello every one… I hope you all are doing well. Today, I have a couple of coffee cards with hope they brighten up your day.

I share this cards at Coffee Loving Cardmakers blog. My cards today, I created using the Brewtiful Stamp Set and Sunburst Stencil from Miss Ink Stamps.

I sprayed the stencil lightly with Pixie Spray and put it on top of a piece of watercolor paper. I added the Mustard Seed and Wild Honey Distress Ink used blending brush. And then I removed it from the watercolor paper.

There were still some inks on the stencil, I sprayed with some water and then I added it on top of another watercolor paper. I added paper towel on top of the stencil, gently pushed it on the paper. This technique also called stamping with stencil. Super easy way to create a distressed watercolor background.

I dried the watercolor background with craft heater and then I cut out both background panels with Divinity Designs – Pierced Rectangles Dies and Craftin Desert Divas – Fancy Frame Dies (sadly they closed their store…).

I added both background panels on the white cards with Scrapbook Adhesives E-Z Runner Grand.

The stamped imaged and sentiment were stamped with permanent india ink that is great for both coloring with copic markers or watercolor medium.

I colored the cups and flowers with Leisure Arts Double Ended Markers and waterbrush. I dried them and then fussy cut them with fine point scissors.

I added them in the middle of the card with 3D foam tape, and I added the sentiment and flower on top of them with liquid adhesive.

Thanks a latte for stopping by… I hope you all have a caffeinated and fabulous day!

Clean And Simple Card | Football Birthday Card

Hello hello hello everyone… Our school has started a month ago, also Fall sports have started their games and Football is one of them.

Today, I have a Football Birthday card to share with you with the newly released stamp set, Fall, Family and Football together with some Foiled Papers and Ghost Ink from Rinea.

All Rinea Glossy Solid Foiled Papers have gold on one side and other gorgeous color the other side. On my background, I used the gold side, trimmed it to 4″x5.25″, and embossed it with stripe embossing folder. I added it on a white card with double-side tape.

I cut out another white cardstock using 2 sizes of Divinity Designs Pierced Rectangle Dies to create a frame. And then, I added it on top of the foiled paper with some double-sided tape.

I cut out one of the emerald starstruck foiled papers (from the Jolly Foiled Paper Variety Pack) using one of the Divinity Designs Double Stitched Rectangles Dies. I added on top of the gold foiled paper with double-sided tape.

I embellished the card with some of the football images from the Fall, Family and Football stamp set. 

I stamped the football goal post image with Ghost Ink on Ebony/Gold Glossy Foiled Paper. I let it dried about a minute and the wiped it off with Purell Handwipe. After that I fussy cut it with micro-tips scissors.

I did the same stamping steps for the helmet and ball. I used the Violet/Gold Glossy Foiled Paper for the helmet and used the Mocha/Gold Glossy Foiled Paper from the Autumn Foiled Paper Variety Pack.

And I stamped the banner on a white cardstock with Nocturne VersaFine Clair Ink Pad and then the sentimenti in the middle of the banner with Fantasia VersaFine Clair Ink Pad. After that, I dried them with craft heater and fussy cut them with micro-tips scissors.

I added the goal posts, helmet, and ball on the card with permanent adhesive, and I added the sentiment with 3D foam tape.

I think…this is one of my favorite masculine cards and I hope you will like this card, too! 

Before you go… take a look at other projects from my team at Joy Clair blog this month! Thank you so much for stopping by!

Spooky Hello…

Hello hello hello everyone… Here’s a little spooky hello card for you. It might be a little early for Halloween card, but since today is Friday the 13th, why not, right?

I use one of the newly released digital stamp sets from Graciellie Design called, Spooky Hello Mega Digital Stamp Set. But as you can see yourself, it is not a scary spooky theme stamp set.

I like to use Silhouette Studio software to work with digital stamp sets. I used the print-and-cut with the pumpkin. I printed it with Laser printer, and then cut it with Silhouette Cameo 3.

After that, I added a piece of the Gina K. Designs Fancy Foil – Dazzling Orange on the pumpkin, put it inside the carrier pocket, and then run it through the laminator. When it’s cold, I removed the foil and voila! Glimmer, dazzling, pumpkin!

You can leave as is, it is cute already. But, I decided to colored the pumpkin with Leisure Arts Double Ended Markers and waterbrush.

For the background, the bottom panel, I created it with some alcohol inks and DecoFoil Gold Transfer Sheet on a glossy photo paper. I trimmed it and added on the white card with E-Z Runner Grand.

The second patterned background, I created it using the candycorn image from the same digital stamp set. I duplicated it and printed it on a 8.5 x 11 white cardstock with Laser Printer in black and white. After that I colored the candycorns with Leisure Arts Double Ended Markers. I cut it with one of the Craftin Desert Divas – Fancy Frames. I added on top of the alcohol ink background with permanent adhesive glue.

I added some twine on the card for the wreath, and secure the twine with permanent adhesive glue. Then I added the pumpkin and sentiment label on the card with 3D foam tape.

I hope this card make this “Spooky Friday the 13th” be less spooky to you all… Thanks a bunch for stopping by today. Have a fabulous day!