Making Cards With Print-and-Cut Files

The Cut Shoppe

Hello everyone… Today I have couple cards to share with you all that I created using The Cut Shoppe Printable Files. These printable files are super fun to use on any kind of projects!

On my cards today, I used the Road Trip Printable that is available at The Cut Shoppe Store and the Summer Sizzle Printable that is for you to download it for free at The Cut Shoppe Scrap Spot Facebook Group. If you have not yet joined the group, you would want to… there are many inspirations from the team and members, too.

I printed the Road Trip Printable File and Summer Sizzle Printable File on white cardstocks with inkjet printer. And then I cut them with my Silhouette Cameo. I am sharing full details about my cards today at The Cut Shoppe Blog.

I hope you all can enjoy the cards and thank you for stopping by my blog today. Have a wonderful day!


I link these cards at:

SaveSave

SaveSave

Masculine Card ~ Thanks For Building Me Up!

A Jillian Vance Design

Hello everyone… Today, I have a masculine thank you card. It is always handy to have any type of thank you cards around and ready to send out.

I am sharing this project over A Jillian Vance Design Blog. On my card today, I used the Pegboard Cover Plate Die as the background. I added the cut out background on a dark brown card with adhesive glue.

I cut out some silver metallic cardstock, black cardstock and woodgrain patterned cardstock using the Tool Time Die Set. I layered the woodgrain cut outs on top of the handles. And then, I added the tools on the card with adhesive glue.

I stamped one of the sentiment from Mr. Fix It! Stamp Set with Icing On The Cake CP Ink Pad on a white cardstock. I trimmed it into a sentiment stripe and then I added some of the ink around the edges with sponges. I added it on the card with 3D foam tape.

Card is done. I hope you all enjoy it. Thank you for stopping by today and have a wonderful day!


I link up at:

SaveSave

Hello Sweet Friend

Gracillie Design

Hello everyone… A new week is here and I hope you all will have a wonderful one! Today I have a fun watercolored, shaker card for a friend.

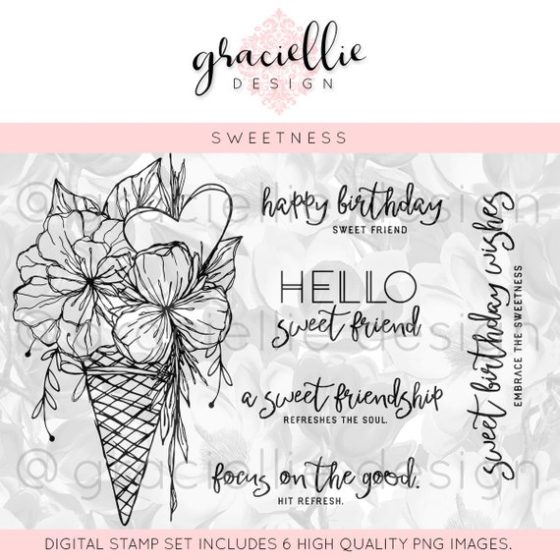
I use the new digital stamp set, Sweetness from Graciellie Design. This beautiful digital is pack with sweet sentiments and image to use for creating projects for friends.

I created the rainbow watercolored background with Koi Watercolor Paints. I started with adding water on a watercolor paper with big flat brush. And then, I started adding the colors and let them blending naturally with water. Once I was done adding the colors, I dried the panel with craft heater. I trimmed it to fit on a A2 (4.25″ x 5.5″) white card.

I cut 2 scallop dies from Craftin Desert Divas – Fancy Frames Dies to create the shaker window. I added a piece of clear acetate paper on it with Scro-Tape double-sided tape and then I added thick 3D foam tape around it. Then, I added the shaker filler with clear jumbo glitter and fine clear glitter in the middle of the card. I make sure the glitter is in the middle and around it is clean, and then I added the frame on top of it.

I printed the ice cream flower bouquet image and sentiment on a white cardstock with inkjet printer. I dried the ink with craft heater and start color the ice cream bouquet with Leisure Arts Watercolor Pencils and waterbrush. I added some glitter on it with Spectrum Noir Clear Sparkle Brush Pen. I dried it again with craft heater, and then I fussy cut the image with micro-tip scissors.

For the sentiment, I cut it into banner strip. I added it on the top of the frame with dries-clear adhesive glue and then I added the ice cream flower bouquet on the card with dries-clear adhesive, I added some 3D foam tape under the extra that sticking out of the edge of frame.

Rainbow always give me hope and joyful feeling in my heart… And I hope you all are inspired to create something today… Thank you so much for stopping by and may you all have a wonderful week!


I link these cards at:

Collaboration Blog Hop ~ Cup of Happiness

Coffee Loving Cardmakers & Fun Stampers Journey

Hello hello hello everyone… Welcome… Today is the day for the Coffee Loving Cardmakers and Fun Stampers Journey Collaboration Blog Hop!

I am super excited to be part of this fun collaboration blog hop with them. Today I have 2 cards to share with you all!

On my first clean-and-simple card, I used the Coffee First Die Set and cut some of the pretty papers from Amy Tan Sketchook – American Crafts 6×6 Paper Pad. I added the cup on the card with 3D foam tape. I also use some other papers from the same paper pad on the background.

I stamped the sentiment from Coffee Helps Stamp Set using VersaFine Clair Acorn Ink Pad, and then I fussy cut it around the word. I added on the card with 3D foam tape, too.

I embellished the cup with the Journey Thread Whip Cream and I added some of the Fashion Silver.

On the second card, I created the background using Sakura Koi watercolor travel set. I simply painted the green and brown stripes on a piece of watercolor paper using flat brush and dried it with craft heater.

I stamped the cup from Coffee Helps Stamp Set using VersaFine Clair Acorn Ink Pad, and I cut the cut using the matching cup die from Coffee Helps Die Set. Then, I colored the cup with Sakura Koi watercolor travel set. I added it on the card with dries-clear adhesive glue.

For the sentiment, I stamped one of the sentiments from Coffee Helps Stamp Set using VersaFine Clair Acorn Ink Pad. I fussy cut the sentiment word. I added the sentiment on the card with 3D foam tape.

I embellished this card with one of the Hello Word Bubbles. They are wooden word embellishment, so fun to use on projects. I added it on the card with dries-clear adhesive glue.

I hope you all enjoy these cards… And I would like to thank Fun Stampers Journey for this amazing collaboration blog hop with Coffee Loving Cardmakers!

*** Blog Hop and Giveaway ***

Your next stop is my teammate, Lisa Bzibziak. And… make sure to comment on each post along the way. The hop will close at 11:55 pm PST on Friday, July 27. Good luck and have fun!

Here is the full list of the blog hop participants just in case you got lost in the middle of hopping:

Fun Stampers Journey Blog

Tania Willis

Patricia Roebuck

Michelle Woerner

Mariana Grigsby

Coffee Loving Cardmakers Blog

Amy Tsuruta

Kerry Urbatch

Helen Gullett — You’re Here!

Lisa Bzibziak — Next Stop!

Robyn Jordan

Lori Turner

Becca Cruger

Dana Gong

Dana Warren

Erin Thiem

Katie Brooks

Kathy Schweinfurth

Laurel Seabrook

Thank you so much for stopping by my blog today. Have a wonderful day!


I also link up at:

SaveSave

SaveSave

SaveSave

SaveSave

SaveSave

Project Thursday ~ Mixed Media Artist Trading Cards

Precious Remembrance Shop

Hello everyone one… Helen is here. It’s Project Thursday time… And today’s project is a set of mixed media Artis Trading Cards that I created using stamp set, bits and pieces, paper snippets, buttons, and VersaFine Clair Ink Pads.

I am sharing a tutorial on these project on Precious Remembrance Shop Blog, too. On these artist trading cards, I used the Little Thing Stamp Set and the Coffee Love Stamp Set.

I stamped the triangles from the Little Things Stamp Set on tissue paper using VersaFine Clair Nocturne (Black) Ink Pad. This is a pigment ink, so it will take time to dry. I set it aside to dry while I was working on the cards.

I used watercolor paper 140 lbs for the artist trading cards. To create the background, I use the ink smooshing technique with VersaFine Clair ink pads and Staz-On All-Purpose Stamp Cleaner Spray. Since these ink pads are oil-based inks, water won’t work with them. But the stamp cleaner works like magic!

The Ink Pads I used on these card backgrounds are:

First, I dab a little bit of the ink on a craft mat, then I spray it with the Staz-On All-Purpose Stamp Cleaner Spray. I smooshed the watercolor paper in the ink. I did one color a the time and then dried them with craft heater tool.

I added thin layer of my homemade texture paste using palette knife on each card. This way give some texture on them and muted the colors a little bit.

After the texture paste dried, I added the pieces of stamped tissue papers on them using gel medium.

Once these cards dried, I added each of them on purple cardstock mat, green cardstock mat, and orange cardstock mat. After that I hand-stitched couple of the edges with white embroidery thread. And I added them again the last 3.5″ x 2.5″ card mats with strong adhesive glue. Lots of layers… I know!!!

Next step, I stamped the cup from Coffee Love Stamp Set with VersaFine Clair – Paradise, VersaFine Clair – Green Oasis, and VersaFine Clair – Summertime. I fussy each of the cup with micro-tip scissors.

On this first artist trading card, I added the blue cup. I added the XOXO word from Bits & Pieces : Love Coupon. I secured it on the cup with mini stapler. I added the cup on the card with strong adhesive glue. I added the sentiment from Little Things Stamp Set that I stamped using VersaFine Clair – Nocturne (black) on a white cardstock, trimmed it into paper strip, and doodled the framed around it with Faber-Castel PITT Artist Pen. I embellished this card with some of the Sweet Lavender Buttons.

On the second and third artist trading cards, I did the same steps that I used to create the first card above.

I also used one of the sentiments from Little Things Stamp Set that I stamped using VersaFine Clair – Nocturne (black) and one of the card from the Paper Snippets : TODAY. I embellished it with some of the Baby Blue Buttons.

And on this third artist trading card, I used one of the cute little cassettes from Bits & Pieces : Daily Thoughts to embellish the cup and the sentiment is from Little Things Stamp Set that I stamped using VersaFine Clair – Nocturne (black). I trimmed the sentiment paper and added on the cassette with adhesive glue. I embellished it with some of the Light Mint Buttons.

For finishing touch, I added some of white gesso on the edges of all the artist trading cards with my finger for extra distress look on them.

Thank you so much for stopping by today… Have a wonderful day!


I play along at:

SaveSave