Best Wishes Watercolored Card

Hello everyone… “April Showers Bring May Flower” I bet you all familiar with that saying, right? We got lots of rain showers in April, and surely they bring May flowers and also will draw more butterflies… One of my favorite flowers in our garden is the giant tulips.

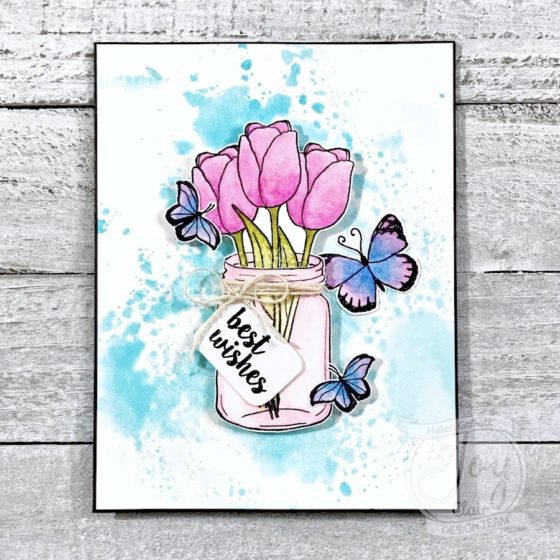
As you can see, my card today is inspired by May flowers and butterflies, also… Joy Clair May Challenge Photo Inspiration. Isn’t that beautiful?

I stamped the jar image from Doodle Flowers Clear Stamp Set with VersaFine Onyx Black Ink Pad on a heavyweight white cardstock. I created a mask for the jar lid by stamping it on a post it note and cut it with scissors.

I also created masks for the tulip from Spring Time Clear Stamp Set. And then I used VersaFine Onyx Black Ink to stamp the first tulip, added the mask on it, stamped one more on the left, and another one on the right. After that, I used Faber-Castell black artist pen to extend the stems.

I colored the tulips and the jar to make it look like pink tinted jar using Leisure Arts – Watercolored Pencils and watercolor brush. To add the extra darker color on the tulip petals, I picked up the pigment directly front the pencil with watercolor brush and painted on them. I did the same way with the stems and jar. I set it aside to dry.

I stamped those butterflies from Butterfly Kisses Clear Stamp Set with VersaFine Onyx Black on a heavyweight white cardstock. First I colored the big butterflies wings by adding colors the just small area of top of the wings with pink watercolored pencil, and then blue at the bottom of the wings. And then using the watercolor brush, I blended both colors.

For the little butterflies, I colored them with blue and purple watercolored pencils with the say method and then blended them with watercolored brush.

I fussy cut the jar of tulips and butterflies using micro-tip scissors.

And then stamped one of the sentiments from the Butterfly Kisses Clear Stamp Set with VersaFine Onyx Black on a white cardstock, and then I trimmed it into a small tag.

I wrapped the jar with natural twine ribbon, tied up a bow, and added the tag sentiment under it with Art Glitter Dries Clear Adhesive Glue.

I created the watercolored wash background on a piece heavyweight white cardstock by adding the Broken China Ink on craft mat, sprayed some water, and dipped the card. I dried it with craft heater. I trimmed it slightly smaller than A2 black card base.

I added the panel on the card with permanent adhesive runner. Next, I added the jar couple of the small butterflies on the card with 3D foam tape, and then I added one big butterfly under the jar with dries-clear adhesive.

For more inspirations and challenge details, head over to Joy Clair blog. I hope you all will have time to play along and share your project with us this month 🙂

Thank you so much for stopping by my blog today. Have a wonderful day!


I also link up at:

Challenge Week 332-333 Anything Goes

Simon Says: Anything Goes

SaveSave

SaveSaveSaveSave

SaveSave

SaveSave

SaveSaveSaveSave

SaveSave

SaveSave

A Mixed Media Card ~ Hello Sweet Friend

Hello everyone… Happy Saturday! I hope you all have a wonderful weekend. Today, I would love to share with you all a mixed media card, Hello Sweet Friend 🙂

In this April, I have been learning more mixed media technique for cardmakers at Stamp Nation Forum called Sleep, Create – Mixed Media for Card Makers Class. On my card today I used some of the techniques.

I started with creating my background. I will be working with some mediums and I like to work with 140 lbs watercolor paper, I have some of them that already cut into 4 1/2″ x 6″ that ready to use. I added some Gelatos on it and blended the colors with baby wipes. I dried it with craft heater.

Next step is to create the collage of tissue papers. I found some of tissue papers from my scrap box. Some of them are Tim Holtz tissue papers and some of them are stamped tissue papers that I had left over from previous project. I added some gel medium on the panel, and added the tissue papers. As I added the tissue paper, I wrinkled them with my finger, and then I added more gel medium all over them to seal them in place.

This next step is getting my finger inky and sticky… 😀 So… I added some teal acrylic paint randomly on it. Next, I added some white gesso randomly on the panel. And then I sprayed the green ink spray on the panel and I ended up with the circular patterns. I dried the spray paint with craft heater but they still kindda sticky when I touch it… so I grab my gold foil and then added it on the card and… VOILA! I got some gold foil on the panel mixed with the spray paint. I told myself, “OH this is so cool!”

Next layer is the bubble wrap pattern. I grab the bubble wrap plastic, tapped in on the VersaFine Clair Warm Breeze Ink Pad, and then I stamped it on the card on both corners. This ink pads is my new favorite, bright and vibrant colors plus juicy! I dried the whole panel one more time with craft heater.

I have some monoprinted papers that I did with Gelli Plate and acrylic paints. I use one of the paper to create the flower. I doodled on the monoprinted paper with black paint marker fine point. I ended up with 3 clusters of small roses, 3 clusters of big roses with leaves, and 3 other single doodled flowers from 1 paper. I trimmed them with micro-tip scissors. I used one of the clusters of roses with leaves on this card.

For the sentiment, I wrote the phrase “Hello sweet friend” on a white cardstock using Faber-Castell Brush black brush pen. I trimmed the cardstock into a sentiment banner.

I added the doodled flower on the card with dries-clear adhesive and I added the sentiment banner with 3D foam tape. And this card is done 🙂

I totally enjoyed every step in the process of making this mixed media card for a sweet friend. I will more for sure! I hope you all also enjoy this card today and be inspired to step out of your “comfort zone” to try something new.

Thank you for stopping by and have a fabulous and beautiful day!


I link up at:

Simon Says: Flower Power

 Simon Says: Anything Goes

SaveSave

SaveSave

SaveSave

SaveSave

Mixed Media Scrapbook Album Cover

The Cut Shoppe

Hello crafty friends… Today I would love to share with you a mixed media scrapbook album cover that I created using digital cutting files.

On my project I am using the Friends Forever, Heart Burst, and Mums The Word cutting files from The Cut Shoppe.

This is what the Smash Journal cover look like before I decorated it using mixed media technique. Head over to The Cut Shoppe Blog where you can read all the details and tutorial.

Thank you so much for stopping by today. Have a wonderful day!

Thursday Coffee Break ~ Thankful For Coffee

Hello coffee loving crafty friends… Raise your hand if you are thankful for coffee… I know I am!!! Let’s take a little break with me today and enjoy your favorite drink 🙂 Today’s project is a clean-and-simple, mixed media coffee card 🙂

I am sharing this project at Coffee Loving Cardmakers blog today. Head over there to read the full details and tutorial, too 🙂

I started with sponging the Vintage Photo Distress Ink all over a watercolor paper, then I sprayed with some water, dabbed with paper towel, and dried it with craft heater. And then after that, I trimmed the paper into 4″ x 5 1/4″ panel.

I distressed the edges with paper distresser tool and sponge more Vintage Photo Distress Ink on them. And that is how I ended up with this fun distressed, textured background 🙂

I added the Coffee Cup ARTPlorations Stencil on the panel, secured it with painter tape, and using old credit card (or you can use palette knife) I added the Heidi Swap – Gold Art Screen Ink. This is not really ink, it is a metallic soft paste. Gently I lifted up the stencil, and I dried the stenciled image with craft heater.

And to get the sentiment at the center of the cup, I stamped one of the sentiments from STAMPlorations – Caffeeology Stamp Set using Mini MISTI and Pinecone VersaFine Clair Ink Pad. I added the finished panel on a 4 1/4″ x 5 1/2″ card with Art Glitter Dries Clear Adhesive Glue. The card is done 🙂

And…before you go… There is a special sale at STAMPlorations Store! All of the stamps and dies are 10% OFF, including all new release — no coupon needed — The discount is automatically applied in the shopping cart! You can even snap them up at an extra 20% off if you use my discount code: STAMPGIRLHELEN (copy paste the code when you check out). Enjoy shopping and saving!!! I hope you all can enjoy this clean-and-simple, mixed media coffee card. Thanks a latte for stopping by today. Have a fabulous caffeinated day!


I link up at:

Challenge Week 332 -333 Anything Goes

 Simon Says: Anything Goes

SaveSaveSaveSaveSaveSave SaveSave SaveSaveSaveSave

SaveSaveSaveSave

SaveSave

Wishing You A Beautiful Season

Graciellie Design Digital Stamp

Hello everyone… We are wishing you a beautiful season… Spring is one of my favorite season and it always inspire me with its colors, flowers, and beautiful sky.

Wishing You A Beautiful Season - Graciellie Design Digital Stamp

Today, I have a card that I created using Graciellie Design Digital Stamp – True Beauty. This stamp set is also available in Spanish version.

I open the PNG files of the window and one of the sentiment with Silhouette Studio software, resized them and printed them on a white cardstock.But, if you do not have this software, you can use any picture editing or even Microsoft Word software that will work well for this step.

I fussy cut the window with micro-tip scissors, and cut out the window slots with craft knife. And for the sentiment, I cut it using one ODBD – Oval Stitched Rows Dies.

I colored the window and flowers with Leisure Arts – Premium Colored Pencils. After that, I blended the colors using ShinHan Touch Twin Colorless Blender Marker.

After that, I painted a simple clear sky and hill landscape scene with watercolor paint and small round brush. I trimmed it to fit behind the window and I added it behind the window with 3D foam tape.

I added the whole finished image on the white card with dries-clear adhesive, and then added the sentiment on it with 3D foam tape, too.

I finished the card by adding some white pearl gems on the flowers.

Wishing You A Beautiful Season - Graciellie Design Digital Stamp

I hope you enjoy the post today… Thank you so much for stopping by and may you all have a beautiful day!


I play along at:

Anything Goes Challenge Week 330 – 331

SaveSave