Mixed Media Card: Joy Love Peace Christmas Tree

Hello everyone… I hope your Holiday’s preparation is going well so far 🙂 This week I am finishing all my Christmas card project and get them ready to send out.

Today, I am sharing a mixed medai card that is inspired by some Christmas tree mixed media canvases that I saw at Pinterest 🙂

Mixed Media Card - Joy, Love, Peace Tree

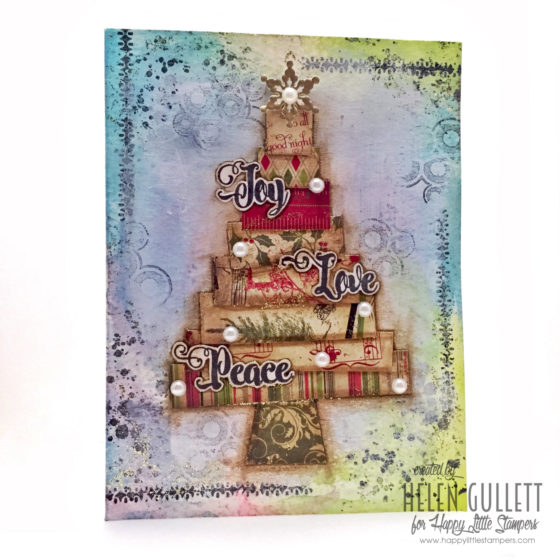
My card sizes is 6″ x 4.5″ and I used Canson Watercolor paper for card base. First, I created the background with Spectrum Aqua Markers and water using smooshing technique and drying in between smooshing to created the extra texture on it.

Then I stamped the splatters, bubbles and border from HLS – Fun Mixed Media stamp set with Memeto Luxe Tuxedo Black ink pad. I added some white gesso with flat medium brush on the background and dried it with craft heater.

I cut out paper strips out of the Christmas theme scrap papers I had to form the tree. I added them on the card with gel medium and when it dried, I added some shadow with Faber Castell Big Brush Pen and smoosh it with my finger.

Next is I stamped and cut out the words from STAMPlorations – Peace Love Joy stamp set and then I added them on the card with gel medium. Then I double-heat embossing the snowflake, cut it out, and added on top of the tree with 3d foam tape.

Mixed Media Christmas Tree Card

I finished this card with some gold glitter glue and white pearl gems. It is finished and I am so tempted just out it on a frame 😀 I hope you are inspired today with this project.

Here’s the full list of supplies I used today on my card:

Supplies:

  • Mixed Media Fun stamps (Happy Little Stampers)
  • Peace Love Joy stamps (STAMPlorations)
  • Memento Luxe Tuxedo Black ink pad
  • Versamark ink pad
  • Princess Gold embossing powder (Ranger)
  • White Gesso (Dina Wakely)
  • Gel Medium (Dina Wakely)
  • Spectrum Aqua Markers (Spectrum Noir)
  • Faber Castell Big Brush Pens
  • Watercolor brush medium flat
  • Water Spray bottle
  • Canson Watercolor paper
  • Random Christmas scrap papers
  • Craft Heater (CTMH)
  • Micro-tip scissors
  • Pearl gems (Hampton Art)
  • Gold Glitter Glue (studio g)
  • MISTI stamping tool
  • Fiskar Paper Trimmer

THANK YOU for visiting me today and have a fabulous day!


I am playing along at:

HLS Mixed Media Challenge December – Anything Goes

HLS December CAS Challenge

The Mixed Media Card Challenge #30 {Gold}

CWS Challenge #9: Use Christmas Stamps

AAA Cards CAS Game #79 – Christmas

613 Avenue Create Challenge #192 – Anything Goes w/Optional Twist – Holiday Happiness

12 Days of Christmas Cards Challenge with Kylie and Friends

Mixed Media Christmas Card – Luke 2:11

Hello again everyone… I have several posts today about new releases and couple challenges. You can scroll down to check on them 🙂 THANK YOU!

And now I would love to share with you a simple mixed media Christmas Card. One of the great Bible verses about Christmas and the birth of the Savior is from Luke 2:11

The Savior—yes, the Messiah, the Lord—has been born today in Bethlehem, the city of David! (NLT)

This verse speaks who He is: the Savior and the Lord. He has been born for all of us, to all human kind in this world! He has been born to redeem, to save and to provide the way for us to the eternal life with Him. Isn’t that the most joyful and hopeful news ever?

Mixed Media Christmas Card - Luke 2:11

I found this stamp from Stampendous at Hobby Lobby a couple years ago and love to use it on my Christmas cards. For this time, I made a mixed media card.

First, I stamped the sentiment on a Canson watercolor paper with Versamark ink pad, added some White Embossing powder, and then heat it up with Craft heater.

I created the galaxy background with Gansai Tambi watercolor paints. I added some splatters with the white paint from the same set. Using Elmer’s Painters fine point white marker, I drew some stars on it. And then I added more dots with the marker.

I added a strip of Snowhaven patterned paper (CTMH, retired) on the side of the card base, and then added the finished mixed media panel on it with Tombow Xtreme adhesive.

It is flat and mail-friendly card 🙂 and ready to be sent away this month. I hope you’ll like this card and inspired to create holiday cards to share the joy of the season with your family and friends.

THANK YOU for visiting me today and have a fabulous blessed day.


I play along at:

SEM Dec Scripture Inspiration Challenge

WAW Challenge Weeks #258-259 – Anything Goes

sss sednesday challenge

SSS Wednesday Challenge – Anything Goes

Christmas Card Challenges – Anything Goes

Paru’s Card Making Challenges – December

Time Out Challenge

Challenge #71 Christmas

CAS Mixed Media Coffee Card

In the beginning of the year, I started exploring mixed media. This technique can be very messy, complicated and lots of layers. At the beginning it intimidated me, but then I figured out that mixed media can be simple, too. Mixed media is basically you mix more than 2 mediums on your project.

So, today, I would like to share with you a simple CAS Mixed Media card with the Sizzix Tim Holtz Alterations Stamp, Die & Texture Fade – Coffee Time and Sizzix Tag die set.

clc-thursday-hello-mixedmedia

First, I created my background with the embossing folder. I added the Canson watercolor paper on the folder and run it through my die cutting/embossing machine. And then I added Hero Arts – Autumn Ombre Ink on the raised side of the embossed paper, and then spray with  the mixed of Perfect Pearl and water in my mini mister. That mixture of spray give the watercolor look and pearly shine on it.

clc-thursday-hello-mixedmedia2

On another piece of canson watercolor paper, I stamped the cup image from the same set with Versafine Onyx Black and then watercolor it with Spectrum Noir Aqua Marker (Crimson). You can see, I am inspired but the Starbucks red cup 🙂 After the image dried well, I die cut it with the matching die that comes from the same set. I also die cut the sleeve our of white card stock and I stamped the word hello as the sentiment from the same set with Hero Art Red mini ink pad.

clc-thursday-hello-mixedmedia1

I die-cut the burlap using one of the Sizzix tag die cut set. Then I added a piece of ribbon on it and secured it with CTMH Mini Stapler. I added the burlap tag on the card with CTMH Liquid Glass Glue (multi purpose glue), and then I added the cup on the burlap with 3D foam tape for extra dimension.

That’s my CAS Mixed Media card with some inking/stamping, embossing, watercoloring, shimmer spray, burlap, ribbon, and cardstock. Simple yet has more than 2 mediums I used on this card. There are many ways you can create mixed media project.

I am sharing this project at Coffee Loving Cardmaking blog today. Visit us there and see coffee-loving inspirations from the team!

clc-coffee-break-logo-640x640

THANKS A LATTE for visiting me today and have a fabulous creative day!

DIY Ornaments With Alcohol Inks and Painter Marker

Alcohol Inks are new medium to me and I am still learning how to use them on my project. I searched some tutorials and ideas on Pinterests and watched severals videos on YouTube, too. And I decided to try them.

I created some background on the other day using Ranger glossy cardstocks and also I tried them on HP Glossy photo papers. The results were vary and interesting. I still want to make more of these panels with mixing colors that I have right now 🙂 I made a card with one of the background panels that I created, you can check it out here.

Today, I wanna share with you… these alcohol ink ornaments. I saw a YouTube video and the lady said that alcohol inks will work on any non-porous surfaces including plastic, ceramic, glass, etc. So, I decided to try them in glass ornaments.

hls-mixed-media-nov2016-helengullett

When we went to grocery shopping, I grabbed a box of these plain metalic ivory/milky white ornaments. And I did some experiments on them. I simply added the alcohol inks on the aplicator and then I added the Blending Solution, then simply tapped it on the ornament all around it until all surface covered.

I did on 3 ornaments this time. I let them sit on apple sauce cups for about half hour to make sure they dried completely. After that, I hand-wrote and hand-drew on each of them with White Painters marker.

They are my first mixed medai ornament! I love the texture and interesting backgrounds from the mixing of colors from the alcohol inks. And I’ll make more! 🙂

I hope this can give you some ideas what to create with Alcohol Inks to play along with the Happy Little Stampers – Mixed Media Challenge this month. Check out more inspirations from the team on the blog and link up your project for a chance to win a gift card from the sponsor, Happy Little Stampers.

hls-mixed-media-challenge-november-2016

Thank you for visiting me today! Have a fabulous day!

Hero Arts Mixed Media Happy Thanksgiving Card

It is November and that means Thanksgiving is almost here. It is one of the Holidays that we can send cards to express our gratitude to our families, friends, relatives, co-workers, bosses, and to anyone who has been a great blessings in our lives. Today, I would like to share with you a Thanksgiving card.

On today’s card, I am using the Hero Arts – Color Layering Grateful Leaves stamp set. This stamp set is beautiful and I cannot stop making cards with them. And I keep it clean and simple, too, for mail-friendly purpose 🙂

img_1475

I did some experiment with alcohol inks and glossy paper. After mixing colors and got inks all over my craft mat and fingers, I ended up with some fun and unique background panels 🙂 One of them ended up with Fall colors. And that what I used as my background card today.

I stamped the maple leaf randomly on the background panel with archival black ink. Archival works the best on non-porous and glossy paper. After that, I used my craft heater to dry the panel well and then added it on the white A2 cardbase with a lot of adhesive runner.

For the sentiment, I cut a strip out of watercolor paper, added some color wash with Spectrum Noir Aqua markers using acetate plastic, and stamped the sentiment from the same staml set with Archival black ink. I embellished the sentiment strip with some natural twine and added it on the card with 3D foam tape. I finished the card with some orange gems to match the Fall color combo on this card.

I hope this card inspire you to create today. When you create a card or any project with embellishments,  link it up with our November Challenge – Embellish It. By linking up, you have a chance to win a $25 gift card to the a2z store! Visit a2z Scrapbooking blog for more inspirations from the Design Team every day!

And if you need crafting supplies and Hero Arts products, check out a2z Scrapbooking Store. Use the code Helen15 to get 15% Off when you put an order of $25 or more. If you cannot find any Hero Arts products that you would like to buy at the store, you can send a request from the store for custom order.

THANK YOU for visiting today and have a fabulous day!


I play along at:

Word Art Wednesday

Challenge Weeks #254-255 – Anything Goes

The Mixed Media Card Challenge: November/Thanksgiving

STAMPlorations Giving Thanks Link Up