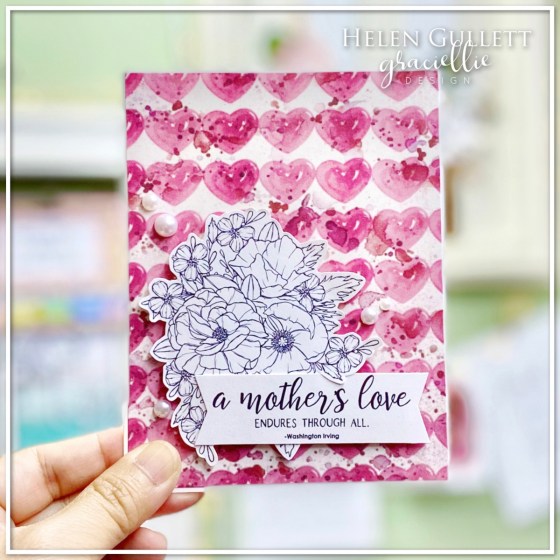
Hello everyone…. Today, we are celebrating a special day. It is Mother’s Day.
I love this quote from Graciellie Design, Happy Mother’s Day digital stamp. And I hope this words encouraging you all today on this special day. Yes… a mother’s love endures through all. A mother won’t give up.
It reminds me of our God’s everlasting love in our lives. His love and faithfulness endures forever.
“For his unfailing love for us is powerful; the Lord’s faithfulness endures forever. Praise the Lord!” Psalms 117:2 NLT
His unfailing love is powerful. His unfailing love saves us from death. His unfailing love gives us life. In his faithfulness we can find hope, peace and comfort.
I have met so many women who (married and single) who have given their lives to be “a mom” to others. They nurture spiritually and physically. I, myself, have a mom, mother-in-law, and many spiritual moms. I give thanks to the Lord for giving them in my life. They have left so many foot prints in my life that help and guide me to know and love God more.
Whether you are a real mom or a spiritual mom or foster mom, you are “a mom” to someone. You are leaving a foot print in someone’s life today.
Hello everyone… Today, I would like to share an art journal page from my travel notebook. I also tried a new technique on my art journal page.
I used the Hope & Strength, a new release digital stamp set from Graciellie Design this week. These gorgeous dragonflies were hand-drawn by Gracie herself. I love all the inspiring and encouraging words from this digital stamp set. They are perfect for such time of this.
I colored the dragonflies on Procreate App, and saved it as png files. And then I printed them and the sentiments on regular printer paper with inkjet printer.
I started with adding paper tape in the middle of the page to cover the gap and then I covered the whole pages with white gesso using flat brush. After that, I dried the white gesso with craft heater.
I grabbed some of the used stained paper towel from my stash box that I saved after cleaning off inks or dabbing off watercolor from stencils in the past.
I tore some of the paper towels and added them on the pages with gel medium. I dried the gel medium with craft heater.
After ages dried, I applied more white gesso on the pages and dried it again.
Next, randomly I scribble some of the Distress Crayons on the pages. After that, I wet my finger with baby wipe and blended the colors.
I added some more colors on the page and sprayed with water and let the colors dripped down the pages. I dried it again with craft heater.
I sprayed some of the mixed media art spray on the page, dried it half way until it still a bit tacky-ish and damp.
I sprinkled some of the WOW! Blueberry Cheesecake Glitter embossing powder on each corner of the page and used coffee filter to catch the powder. I melt the embossing powder with craft heater. It is shiny, glittery and glossy!
I cut out the printed sentiments and added them on the page with gel medium. But I found out that the gel medium smeared the printed letters. I would suggest to use regular permanent glue instead gel medium.
I added some more splatters on the page with the mixed media art spray and the white spray that I mixed myself (white acrylic paint, water, white glue). I dried the whole page again with craft heater.
I added some shadow around the sentiments with Distress Crayon. Since the letters faded and smeared by the gel medium, I used Posca Fine Tip black marker to make them bold again.
I fussy cut the dragonflies with micro-tip scissors and I added them on the page with the permanent glue stick.
I added some shadow around the dragonflies with black watercolor pencil and waterbrush. I dried them with craft heater again.
I used Distress Crayon to add the shadow around the whole pages and I sprinkle some WOW! Metallic Silver Sparkles Glitter embossing powder randomly on the edges and heat set them with craft heater.
And I decided heat-embosse all the dragonflies’ eyes using the VersaMark pen and the same glitter silver embossing powder.
I used the Posca Fine Tip black marker to draw the trail dots on each of the dragonfly.
And the last step, I added some more splatters using the cocoa mixed media art spray. I dried the whole page again with craft heater.
Here’s a quick close up on the finished page:
That’s my travel notebook art journal to share with you all. I hope this encourage you today. Never lose hope.
Thank you so much for stopping by today. Have wonderful, blessed day!
Hello everyone! This month is a graduation month. I know it is not the kind of graduation that we all imagine but there is one thing we can celebrate: God’s goodness in the graduate’s life.
I would like to share with you all this graduation gift box card that I made:
I used the Neat and Tangled Box Die to make that gift box. I die cut the yellow cardstock for the base box, then I cut out another purple patterned pape with the box die but this one I trimmed it to use it just for the front.
I put the box together using permanent adhesive glue, and I added it on the front of the card with same adhesive glue. I tucked in the a piece of tissue paper inside the box and I secured it with some glue.
I used an old graduation stamp set from Close To My Heart. I stamped the hat and certificate scroll with black ink pad on a white cardstock and fussy cut them with scissors. I added them on the box with adhesive glue.
Then I stamped the sentiment right under the box with the same black ink pad.
Today is the new May Anything Goes With Dies challenge goes live. There are several challenges on Happy Little Stampers blog that will give you inspirations to create this month. Hope you all can play along with our challenge and share your projects with us.
Thank you so much for stopping by my blog today. Have a wonderful day.
Hello everyone! Welcome to the STAMPlorations Spring Fling Blog Hop and Linky Party! We’re kicking off this Spring season in a fun way.
For this blog hope today, I made this Spring themed mixed media card to share with you all.
I am a believer that we all are meant to bloom in wherever we are planted and strive through any circumstances. Life is a gift. Don’t give up, bloom my friends… bloom!
I used heavyweight cardstock for the background because I did several layers with stencils and various mediums.
I used basic stencil by adding Distress Oxide ink pads on the stencil with blending brush, and also stamping with stencil technique.
When I was done building up the stenciled background, I added a thin layer of white gesso around the cardstock to mute some of the colors. And I added some Gelatos around the edges of the cardstock for some shading. After that I dried it with craft heater.
Next, I used second generation stamping and third generation stamping technique to add extra texture on the background with the stamps and VersaFine Clair ink pads.
I dries the whole panel one more time to make sure all dried well and then I cut it with the medium size stitch rectangle die. I added the background panel on a white card with permanent adhesive runner.
I added the sticker sentiment on a piece of white cardstock. After that, I trimmed it with paper trimmer. Then, I added the sentiment label on the card with 3D foam tape.
I embellished the card with some of the circle sequins from the Confetti Shaker Blend pack using dries-clear permanent glue.
I hope this card brings some smiles on your face and give a spark of idea to create. For more Spring Fling inspirations, head over STAMPlorations Blog.
GIVEAWAY
There several ways for you to have chances to win the amazing prizes. You can join the linky party at STAMPlorations Blog, leave comment on STAMPlorations Blog, and leave comment on each designer’s blog. Commenting and linking up end on Sunday, May 31. The winners announced on June 10 in the May winners announcement post at STAMPlorations blog.
SPRING FLING SALE
All throughout May, all products in the SPRING FLING section are 15% off instantly + 20% using code STAMPGIRLHELEN and that means you can save up to 35% off on your order!!!
Thank you so much for hopping by my blog today. I hope you all stay safe and healthy… Have a wonderful day!
Spring flowers are blooming. New season has arrived and that reminds us there is always new hope and mercy coming into our lives. Be strong, my friends
Today, I would like to share this card caddy gift bag that I made for a friend. This gift bag is filled with 10 handmade cards and envelopes.
On my card caddy gift bag, I used several Graciellie Designs gorgeous designs: Friends Like You digital stamp (flower), God’s Grace digital stamp (sentiment), and couple patterned paper from Pink & Blue Watercolored digital paper pack.
I cut out heavyweight white cardstock using Divinity Designs Card Caddy & Gift Bag Dies Set. I used strong permanent double sided-tape to put this card caddy gift bag together. For the handles, I used permanent liquid glue.
I printed couple patterned paper from the digital paper pack. I added a thin layer of liquid glue around the patterned paper and then while it was still tacky, I added the Therm O Web DecoFoil Gold sheet. Now, it has gold frame for extra shine.
I added those 2 patterned papers on the front of the card caddy gift bag using permanent adhesive glue. I added White pearls at four corners.
I cut out the printed sentiment using the Divinity Designs Double Stitched Rectangle Dies and then I added it on the bag with permanent adhesive glue.
For the 30-day coloring challenge at Kathy’s blog today, I colored the flower with Pearlescent watercolor paint. I really wish that my camera can capture the pearly look on the flower. I added the flower on the bag with 3D foam tape for extra dimension.
The gift is done and ready to be delivered. I hope this project sparks an inspiration for you today.
Thank you so much for stopping by my blog. Have a wonderful blessed day!