Thinking of You, and more

We are on the last Wednesday of the first month in 2015. Time flies so fast and I feel like still so many things to catch up with family, house work and ministry. But I trust in the One who gives me the strength to do what He has called me to do. I trust in Christ Jesus.

“For I can do everything through Christ, who gives me strength.”

(Philippians 4:13, NLT)

I hope this truth speaks to you as well, especially when you start to feel overwhelmed by so many things you need to do. We always can find the strength God has provided for us through His son.

Sometimes, we just need to take a break. On my “break time” today, I had a chance to play with the new Neat and Tangled stamp set, Paper Cut Flowers. You wanna check out their blog for gorgeous inspirations done by the design team.

I had fun creating cards with Neat and Tangled new stamp, Paper Cut Flower. Stamped & heat embossed both flower & sentiment, then added watercolor for the background. Finished it with some gold sequins and twine. Please visit http://helengullett.com/?p=6459 for detail how I made this card.

I went with clean and simple with this card. On a piece of watercolor paper, I stamped & heat embossed both flower & sentiment, and then added watercolor for the background. You can let it sit to dry or dry it using craft heater for faster drying. To finish the card, I added some gold sequins and twine.

Over Simon Says Stamp blog today is the Work It Wednesday first challenge of the year. They challenge us to create anything “NEW” – new product, new technique, etc. Since I create this card using Neat and Tangled new product, I link this up there 🙂

But I cannot stop thinking what else I can create using this pretty petals. So, I made one card 🙂 This time I am inspired by one of the Neat and Tangled DT member, Miriam Prantner. She shared on the Neat and Tangled blog a beautiful card using this Paper Cut Flowers stamp set.

And here’s my card:

I had fun creating cards with Neat and Tangled new stamp, Paper Cut Flower. Stamped & heat embossed both flower & sentiment (on a piece of vellum), then added watercolor for the background. Finished it with some silver sequins and clear sparkles. Please visit http://helengullett.com/?p=6459 for detail how I made this card.

The background I creating using the technique I learned from Catherine Pooler on her YouTube video tutorial how to create Batik Background. It is a fun technique, messy but turn out pretty 🙂

And this card I link up at Simon Says Stamp, Wednesday Challenge – Anything Goes this week.

Thanks for visiting today! I hope you like these cards 🙂

Supplies:

  • Neat and Tangled Paper Cut Flowers stamp set
  • Strathmore Watercolor paper (Walmart)
  • Watercolor paint (Target)
  • DCWV Glitter Metallics Matstack (Archivers)
  • 4.24 x 5.5 card and 5.75 Square card (HobbyLobby)
  • Bazill Vellum Paper (Archivers)
  • CTMH Exclusive Ink Pads: Lagoon, Pacifica, Twilight (retired)
  • Versamark Ink Pad (CTMH store)
  • Ranger White Super Fine Embossing Powder (CTMH store)
  • Zing! Black Opaque Finish Embossing Powder (AC Moore)
  • My Acrylix Blocks 3 x 3, 1 x 3 1/2 (CTMH store)
  • Craft Heater (CTMH store)
  • Gold Sequins (assortment pack from Walmart)
  • Silver Sequins (CTMH store)
  • Clear Sparkles assortment (CTMH store)
  • Gold & White Baker’s Twine (Pick Your Plum)
  • Scallop Border Punch (CTMH store)
  • Micro-tip Scissors (ek Tools)
  • Adhesive runner & 3D Foam Tape

Hello Friend

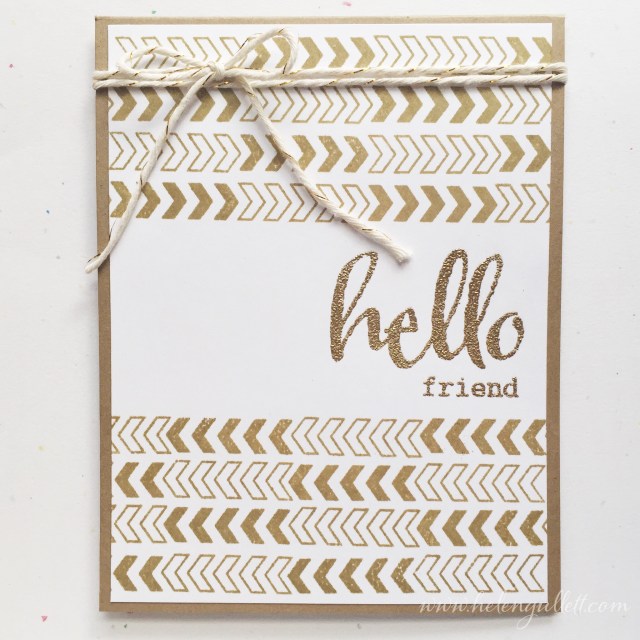
Masculine card has been always a challenge for me. This is a card I made today turn out to be more masculine style than I was planning to be 🙂

IMG_4643-0.JPG

I picked kraft cardstock as the base card, wanna have similar ink color for the border and black for sentiment. But I tried gold for the sentimen and turned out monochromatic. Love it 🙂

I bought Winnie & Walter – V for Chevron stamp set last year and had not any time to play with it yet. But today, I had so much fun creating this monochrome card.

First I stamped the chevron with Desert Sand Exclusive Ink Pad multiple time creating the bottom and above borders. And then I heat embossed the sentiment from Winnie & Walter – The Big, The Bold and Happy stamp set. I mixed the Gold embossing powder (CTMH) with Clear Glitter embossing powder (Whisper, I got it from AC Moore).

I link up my card at 3 amazing challenges:

Darnell’s NBUS Challenge. This is one fun challenge, just perfect for me (and you, too) who have TONS of Never-Before-Used-Schtuff lying around screaming to be used 🙂

Winnie & Walter 1st Birthday Bash. It is a one month long celebration! Today, I join the One Challenge with Shay.

IMG_4647.JPG


And The Stamp Nation 4th Birthday Bash – Clean and Simple Masculine Card. Catherine has created an amazing card for inspiration on the forum!

Screen Shot 2015-01-26 at 3.55.00 PM

Joyful Holiday Blessings

Today I am playing with Virginia’s View Challenge #11 – Clean Slate. I really like her challenge that give us so many inspirations to create. I hope you wanna check our Virginia’s challenge and play along 🙂

This month main theme is Clean Slate. She provides these inspirations:

IMG_1732.JPG

Aren’t they pretty inspirations? I am thinking of Christmas cards when I saw them 🙂 So, I created not only one but 2 cards:

Joyfull Holiday Blessings 1

Joyfull Holiday Blessings 2

I found the holly leave embossing folder at Hobby Lobby. Using my WRMK Evolution Advanced embossing machine, I embossed the front cards. The first card, I stamped and embossed the sentiment, then run it through the machine. And the second card, I run it through the machine and then added the stamped, heat embossed sentiment on a green cardstock.

Here are the close up on the sentiment, I used Winnie and Walter – The Big, The Bold and Blessings, Ranger Gold Princess Gold Embossing Powder and heat set it using my Craft Heater.

IMG_1724.JPG

IMG_1730.JPG

I finished the cards with twine and die cut poinsettia flowers (from Lori Whitlock) that I cut using my Silhouette Cameo.

Do you start early making Christmas cards or later?

Snow Thank You Card

Today is my day sharing my project at Stuck On You Sketches Blog for their new Die Cut Challenge. This time theme is to use any SNOW die cuts on your projects. Don’t forget to link up your project (s) here.

And I decided to make a card for a friend 🙂

IMG_4563

I used a A2 card for the base. For the mat, I cut a piece of White Daisy cardstock (3.75″ x 5″) and then I embossed it using Chevron embossing folder. I added the felt snow flake die cut on the card. The thank you banner is from For A Friend stamp set that I stamped on a piece ofWhite Daisy cardstock using Crystal Blue and Glacier Exclusive Ink Pads.

IMG_4530

Thank You for stopping by today!

Scrapping Everyday Miracles – January 2015 Challenge

Welcoming the New Year, Scrapping Everyday Miracles has 3 new challenges on their blog for this month. The Design Team have created lots of inspirations for you to play along with us this month, check them out here. And every day, the team also will be sharing some tips, techniques, and encouraging posts on the blog.

You have until the end of January to play along with their challenges, read all the challenge rules and link up your project here.

The Layout Sketch Challenge

The Card Sketch Challenge

The Bible verse Theme Challenge – 2 Corinthian 5:17

“Therefore, if anyone is in Christ, the new creation has come: The old has gone, the new is here.”

And this month, I play along with the Card Sketch challenge. Here’s the card I created:

IMG_4368

I embossed the card based using my WRMK Evolution Advanced and CTMH Quatrefoil Embossing Folder. Using Watercolor brush, I pick some Hollyhock Exclusive ink from the ink pad lid and splatter it on the card randomly while I squeezed the water out. Have to be very careful to do this because you do not want the water to flow too much out of the brush and will soak your card.

Then I let the card based dry on the side. While it was drying, I cut a piece of White Daisy cardstock for the tag using my Silhouette Cameo and punch the bottom of the tag using Scallop Border Punch. Then tie up a piece of Baker’s twine I had in stash (I forgot the color’s name of it… sorry! But it is grey and white).

IMG_4369

For the flowers, on White Daisy cardstock, I stamped the flowers from The Big, The Bold and Extras set from Winnie & Walter using Hollyhock and Blush (retired, replaced with new pretty color, Pixie) Exclusive Ink Pads, then the leaves using Pear and Topiary Exclusive Ink Pads. Then I cut them using micro-tip scissors. I arranged them on the tag and glued them using glue pen. Then added some Sparkle Clear Assortment gems. From the same stamp set, I stamped the banner and sentiment using Black Exclusive ink pad. I added the banner on top of the flower cluster using 3D Foam Tape.

Before adding the tag on the card base, check to make sure the splatter ink is dry completely, if not, you can use any embossing heater to dry it, like I did using my Craft Heater. When it was completely dry, I added the border paper and arrow that I cut out from Heartstrings paper packet (lovely paper for this theme). Final step is to add the tag on the card. I glued the twine using a little bit of Liquid Glass (all-purpose liquid glue, dries clear, strong – best glue I ever used!) so it stays on the card, not flapping around. And my card is done 🙂

THANK YOU so much for visiting today!