SOUS Die Cut Challenge – Anything Christmas

There are many ways you can decorate or dress up a plain paper gift bag. And today I am sharing my project at Stuck On U Sketches, Die Cut Challenge – Anything Christmas. Check out the project there and how I created this gift bag.

You still have time to come and play along with us this week! Link up your projects here to share with us! I am looking forward to see them! Have a Merry Christmas!

Supplies:

Thanks for visiting!

Watercolor Wreath Christmas Card

9 days ’till Christmas! Can you believe that? I am a little behind with sending Christmas cards this year… but almost finish today! 😀 A lot of writing for sure, but my oldest is helping with writing cards this year, that is fun 🙂   Making Christmas cards are super fun for us. And today, I would love to share a card I made to play along with Curtain Call Inspiration Challenge, Candy Cane.

I am inspired by the Candy canes and wreath. I used couple retired products from CTMH for this card. Oldie but still goodie 🙂

For the base layers, I used Sparkle and Shine paper packet that one side of the pattern is candy cane and the other is polkadots. I cut 2 sizes of squares, 5.25″ (candy cane side) and 4.75″ (polkadots side) for base the layers. Then on a watercolor paper (3.25″ x 3.25″), I stamped the wreath branch with Chocolate exclusive ink pad and sprayed with some water. And then I stamped the berry dots with Ruby exclusive ink pad and sprayed with some water, for some watercolor effect. With the same technique, I stamped the sentiment in the middle of the wreath with Olive exclusive ink pad.

noel-winter-berry-wreath-curtaincall2014-hmg

I added some natural baker’s twine and some pearl adhesive gems on it. Then added it on the card using 3D foam adhesive. I love how the watercolor effect using dye inks turned out 🙂

Noel - Watercolor Winter Berry Wreath

Thanks for stopping by today! Have a merry December!

Christmas Cards: Watercolored, Distressed and Blinged

I am working on my last Christmas cards this week… I thought I had enough but so thankful to know that there were some new friends and mission partners God has brought into our life this year! We are rejoicing!

Today I would love to share couple of the cards I made using some retired products from Close To My Heart. Both cards are 5.75″ square.

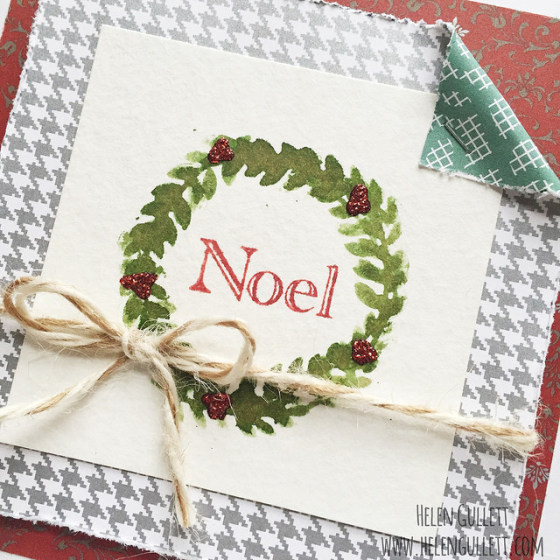
Card 1 I used some of Sparkle and Shine paper packet and I distress the edge of the second layer paper using Edge Distresser. I really like this distress tool, easy to use and quick way to create torn edges 🙂 Then I tucked one of the corners and secured it with Mini Stapler.

noel-wreath-card-sss-1a

On a square piece of watercolor paper I stamped the wreath using Olive exclusive ink pad. The wreath I actually created using a leaf brach from It’s The Little Things set (SOTM November 2014). I drew a thin circle as guide and stamped the leaf repeatedly after I sprayed with little water to give the watercolor effect.

With the same technique, I stamped the Noel sentiment in the center of the wreath using Ruby exclusive ink pad. Then I embellish with some Studio G red glitter glue, I found it at Walmart scrapbooking area. I set it aside to dry completely before I added the twine and glued it on the card.

noel-wreath-card-sss-1b

This card I link up this card at Virginia’s View Challenge #10, All Things Distressed

And this second card, I link up at Simon Says Stamp Wednesday Challenge, Bling It On. I used the same products and technique to create this card. A little bit different design.

noel-wreath-card-sss-2a

For the wreath, I only stamped the leaves one layer and then I added some red adhesive gems on the wreath. Then I add the baker’s twine on top of the card.

noel-wreath-card-sss-2b

Thank you for stopping by today and have a merry December!!!

Peace – SOUS Die Cut Challenge

Today is new challenge at Stuck OnU Sketches – Die Cut Challenge. This week new challenge theme is Into The Woods. You can create any projects that use die cuts like: woods, trees, deers, hunting, camping out, etc. As long as they are showing the theme and die cuts.

Here’s my card I made for this challenge:

IMG_3551.JPG

The watercolor paper itself is thick and curled when I colored with, so I added on my card base using strong adhesive to keep it laid flat well.

I cut the wood using my Silhouette Cameo. And then I attached it on top of a piece of watercolor paper using 3D Foam Tape.

IMG_3555.JPG

For the sentiment, I cut these words – Peace, Joy, Hope – all together using Watercolor Paper with my Silhouette Cameo. I used blade 6, Speed 3 and Thickness 33, double cut for the cutting setting.

Before I peeled them off from the cutting mat, quickly and lightly I added some watercolor paint on them. Let them dried for few minutes and peeled them off.

IMG_3553.JPG

Then I added the word Peace on my card using Liquid Glass, it is a strong and dries clear liquid adhesive from Close To My Heart.

Now, it is your turn to show us what you create for this challenge 🙂 Get your die cut machine to work this week and link up your projects here at Stuck OnU Sketches – Die Cut Challenge.. While you are there, check out the projects that the SOUS Die Cut Team have created for your inspirations 🙂

I cannot wait to check on your projects!

Gold, Silver, One Layer Card

I cannot believe that Thanksgiving is approaching fast!!! I hope you all are ready for this special day. Today, I would like to share a quick Thanksgiving card I created. I am inspired by Virginia’s View Challenge #9 this month:

So many gorgeous pictures for inspirations, aren’t they? And I decided to go with one layer with gold and silver embossing only. A quick and simple Thanksgiving card.

IMG_3436.JPG

I arranged the leaves from Thankful Heart stamp set (B1463) on 3″ x 3″ My Acrylix® Block and stamped them using VersaMark ink pad (Z891) randomly on the card. Then I added some Ranger Gold Embossing Powder (Z2066). Then heat set it using Craft Heater (Z555). After that, I stamped the sentiment using VersaMark ink pad (Z891) and added some Ranger Silver Embossing Powder (Z2067). I heat set it.

I love the metallic looking!

IMG_3437.JPG

Inside the card, I added a piece of copy paper that I folded into two and used Scallop Border punch (Z1851) to punch the edge. I added it inside layer using adhesive in the middle of the card. Then stamped the Happy Thanksgiving from Thankful Heart set (B1463) using Autumn Terracotta Exclusive Ink Pad (Z2101).

IMG_3438.JPG

I also link up this card at Inspire Me Monday, Week 150. Thank you so much for stopping by today!