Good morning… It is Thursday and let’s take a little break with me at Coffee Loving Cardmakers Blog.

Grab you favorite drink and enjoy 🙂


Good morning… It is Thursday and let’s take a little break with me at Coffee Loving Cardmakers Blog.
Grab you favorite drink and enjoy 🙂
One of my favorite craft supply to work with is wood slice 🙂 and today I am going to share how you can make a wood slice sign with big 3D paper flower on it. It is a fun project making your own home decor.
Cutting files I use for this project today is from The Cutting Cafe – Paper Flower Template. This file comes with 3 different sizes but for this project enlarge the flower to 5 inch in diameter. To put it together this flower is very easy 🙂 You can watch the video tutorial here. The Cutting Cafe provides many cutting files that you can use with any electronic cutting machine, and also they have various digital printable stamps that you can use for projects.
After I resized the shape, I cut it with my Silhouette Cameo. I used 8.5 x 11 cardstocks. I cut 3 times, or 6 petals.

I added some Chocolate Distress Ink with sponge on each petal to give some distress and vintage look on it.
Then using the back of my largest brush and fun foam as the padded mat, I curled the petals just like in the video tutorial.
After that, I put them together with glue gun (or you can use any strong and dries quickly liquid glue you have).

I added it on the 9 inch round Wood Slice with hot glue gun, or any strong glue you have (wood glue will work, too).
I love how it turned out. It is up on the wall 🙂 So, do you like to make your own home decor?
I hope you are inspired today. Thank You so much for visiting me and have a fabulous blessed day!
Good morning 😊 I am here today to share another Christmas In July project. Today is a fun shaker card with some foiled elements. There are many ways we can create shaker cards. One of my favorites ways is making shaker cards with Silhouette Cameo.
This time, I am using one of the beautiful cutting files from The Cutting Cafe – Christmas Bulb Greetings set. In these file sets, you will recieve cutting files you can use with any electronic cutting machine and also template you can use to cut out the shapes if you do not have cutting machine. Also, there are printable digital Christmas sentiments! It is all what you need to make shaker cards!

I imported all svg files to my Silhouette Studio library. Them I opened the Joy cutting file set, and send it them to cut. And my Silhouette Cameo machine cut them all at once in a jiffy!
I used Darice – White Cardstock 120 lbs for the pieces and card base. The background is one of mh favorite Chritmas stash, it is one of the patterned paper from CTMH – Snowhaven paper packet (retired).

Once I have them all cut, I used my Silhouette spatula to pick them up from the cutting mat. You can use any flat tool to pick the smaller pieces off the sticky mat.

I set asidr the panel. Then I added some glue on the snowflake and the word joy using Martha Stewart felt point glue pen. You can use any liquid glue for this step. I covered the whole surface and let it dried for couple minutes until they felt tacky to touch.
This is one of the tricks to add foil on projects without using laminator or Minc machine.

Then I added the Deco Foil on them. I used the gold foil for the snowflake and melon foil for the word joy. There were still some white spots on the pieces when I lifted up the foils. To fix that I added some glue on the white spots, let them dried and added more foil on it until all covered.
I used my bone folder to make sure the foils stick on the pieces. The woalah! They are shiny now!
Then I added the foiled pieces on the base panel with glue pen.
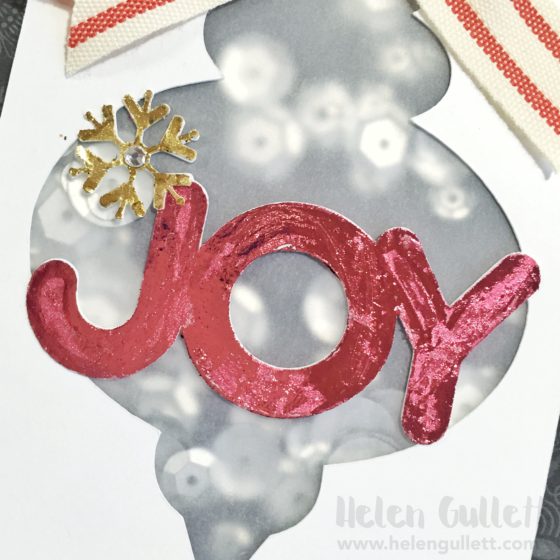
Next step is creating the shaker. This time I used Vellum paper instead of acetate for the shaker window. I think it gives softer look behind the shiny foiled elements.
I added 3D foam tape behind the base panel after I glued the vellum paper, and then added some assorment silver sequins I got from Hobby Lobby.
I finished the card with a bow I made from Stripes Red Ribbon from CTMH (retired). And a bitty sparkle gem on the snoflake.
And check it out how fun it is to shake this card 🙂
I hope you’re inspired today and like this card as much as I do. Thank You So Much for visiting! Have a fabulous and blessed day!
I play along at:

Camp Create 2016 – Fantastic Foiling

AAA Cards Game #69: One Stash Favourite

HLS – July Christmas Challenge: Gold


Today’s card is created using one of the monoprints I created the other day with Hero Arts stencils, Gelli Print Plate and acrylic paints. Check the post here 🙂
I created the background with Bubble Dance – ARTplorations Stencil and paint spray that I mixed by myself. Then I cut the panel with Craftin Desert Divas – Fancy Frame Dies and Evolution Advanced diecutting machine. Then I stamped the images from Happy Art Stamp Set and Blossom Stamp Set from Precious Remembrance Shop with Memento Luxe Tuxedo Black Ink Pad.
Once the background dried well, I added it on the card base with Tombow adhesive runner and then I added the stamped panel with 3D foam tape for some dimension.
My mixed media card is done 🙂 I hope you like today’s project and have a fabulous blessed day!
I play along at:

SSS Work It Out Wednesday June 2016


STAMPlorations July CAS Card Challenge


Today, I am sharing another Christmas in July project and this time is a mixed media card.
I have been playing with my Gelli Plate to create monoprint backgrounds. The one I have is the 5×7 plate. And I used Plaid FolkArt acrylic paints and pulled the positive and negative prints for each stencils. I tell you, this monoprinting is fun and addictive😀
Stencils I used today Hero Arts Chevron Stencil Pair and Hero Arts Floral Filigree Stencil Pair. There are 2 stencils in a set. I used 4 of them and ended up with 8 different prints.

Here’s a card I made with 2 of the monoprints, Hero Arts Peace Bold Wood Stamp, and Fancy Frame Dies set from Craftin Desert Divas. I stamped the sentiment on white cardstock and fussy cut it with micro-tip scissors.

Check out the sparkle and shine from Metallic Gold paints I used on this card:

Please visit a2z Scrapbooking Blog for more details how I created this card and I also posted a slide show of the steps there 🙂 See you there! THANK YOU so much for visiting today and have a fabulous day!
I play along at:

Word Art Wednesday Challenge week #238 – #239

Work It Out Wednesday – June 2016

Mixed Media Card Challenge #25: Sparkle

