Christmas Cards: Watercolored, Distressed and Blinged

I am working on my last Christmas cards this week… I thought I had enough but so thankful to know that there were some new friends and mission partners God has brought into our life this year! We are rejoicing!

Today I would love to share couple of the cards I made using some retired products from Close To My Heart. Both cards are 5.75″ square.

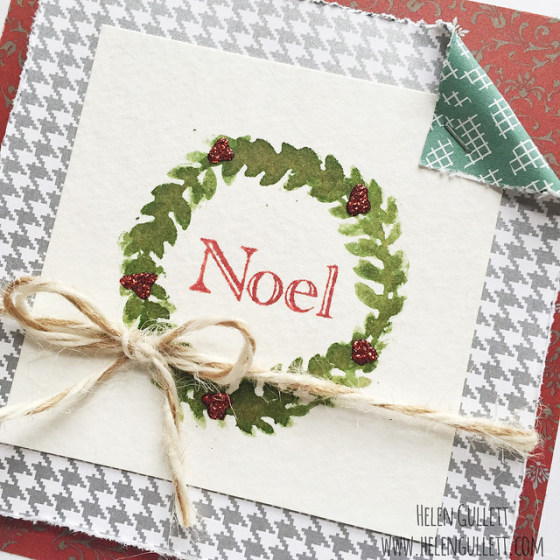
Card 1 I used some of Sparkle and Shine paper packet and I distress the edge of the second layer paper using Edge Distresser. I really like this distress tool, easy to use and quick way to create torn edges 🙂 Then I tucked one of the corners and secured it with Mini Stapler.

noel-wreath-card-sss-1a

On a square piece of watercolor paper I stamped the wreath using Olive exclusive ink pad. The wreath I actually created using a leaf brach from It’s The Little Things set (SOTM November 2014). I drew a thin circle as guide and stamped the leaf repeatedly after I sprayed with little water to give the watercolor effect.

With the same technique, I stamped the Noel sentiment in the center of the wreath using Ruby exclusive ink pad. Then I embellish with some Studio G red glitter glue, I found it at Walmart scrapbooking area. I set it aside to dry completely before I added the twine and glued it on the card.
noel-wreath-card-sss-1b

This card I link up this card at Virginia’s View Challenge #10, All Things Distressed

And this second card, I link up at Simon Says Stamp Wednesday Challenge, Bling It On. I used the same products and technique to create this card. A little bit different design.

noel-wreath-card-sss-2a

For the wreath, I only stamped the leaves one layer and then I added some red adhesive gems on the wreath. Then I add the baker’s twine on top of the card.

noel-wreath-card-sss-2b

Thank you for stopping by today and have a merry December!!!

12 Days DIY Christmas: Day 12

Day 12. I wanna thank you all for visiting my blog to see the 12 Christmas ideas in 12 Days. It has been a fun 12 days making and sharing them with you all.

Also, I am so glad that my youngest sister who live across the globe were able to share her projects with you all! I showcased her first Christmas tree she made using Starbucks coffee cup sleeves. If you have not yet seen it, you can see her project here.

And today, I wanna share again her other Christmas tree project she made to decorate her office.

IMG_4132.JPG

She made it our of Post It sticky notes!!! Isn’t she creative? She cut them and stacked them on her glass window. It is a pretty big paper Christmas tree 🙂

IMG_4133.JPG

That is the last of our 12 DIY Christmas projects that we would love to share with you all. Hopefully, like them as much as we love making them.

Thank You for visiting and have a very merry December!

Holiday Coffee Lovers Blog Hop & Blog Candy

Today is the last day to link up at Holiday Coffee Lovers Blog Hop at Amy’s blog and keep reading because I have a blog candy at the end of the post…

IMG_3536

This is my 3rd project that I link up:

IMG_4085.JPG

I made a window card with my Silhouette Cameo. Oh wait… have you enter the Silhouette Giveaway? You still have time to enter the giveaway here until December 15th.

This cutting file is from Loni Leah, Loop Frame Card. I cut the card base with Kraft Cardstock. My blade setting is for Kraft but I changed the speed to 2.

For the hot cocoa cup with cream on top, the cutting file is from Echo Park, You Warm My Heart. I resized it to fit in the middle of the window.

IMG_4083.JPG

Then I stamped the sentiment from WOTG Snowhaven Cardmaking Kit. with Photo Vintage Distress Ink. And I added some clear glitter on top of them.

Now… for the last day of link up, I would love to giveaway a blog candy:

Christmas Greetings’ Clear Stamps set

4 rolls Christmas washi tape

2 spools Baker’s twine (Green-White and Silver-White)

IMG_4074.JPG

You have 7 chances to enter this giveaway and it is open until Monday, December 15th, 2014 at 11:59 pm EST. Winner will be randomly picked and I will contact the winner on December 20th 🙂

Here’s how to enter:

  • Leave a comment on my today’s blog post
  • Like and follow me on Facebook – leave one more comment
  • Follow me on Twitter – leave one more comment
  • Follow me on Google+ – leave one more comment
  • Follow me on Pinterest – leave one more comment
  • Subscribe to receive updates on your email, form on the side bar – leave one more comment (THANK YOU so much for subscribing!)
  • Follow me on Bloglovin’ or NetworkedBlogs – leave one more comment

THANK YOU for entering and Good Luck! Have a merry December 🙂

Holiday Coffee Lovers Blog Hop: Coffee Cup Gift Card Holder & Ornament

Have I told you that I love coffee, hot cocoa, and chocolate?  Adding to that… I love making cards, too. That is enough reason to say that I love Holiday Coffee Lovers Blog Hop over Amy’s blog. Too much love… LOL!

IMG_3536

Today I would love to share my second project I link up at this merry blog hop:

IMG_4070.JPG

This is a coffee cup gift card holder and ornament. I found this cutting file on Silhouette Design Store from A Little Hut. After I cut the shapes using Silhouette Cameo, I stamped the peppermint and heat embossed them. On the sleeve, I stamped the leaves with Olive Exclusive Inks Pad. Then stamp the sentiment banner on a piece of White Daisy cardstock with Ruby Exclusive Inks Pad. The stamp set I used is Merry, Merry (C1591). Final touch I added some Bitty Sparkle.

I added a piece of twine for an option to hang it as ornament after the recipient remove the gift card 🙂

Here’s what it looks inside with a slot where you can put the gift card.

IMG_4073.JPG

Here are couple close ups….

IMG_4071.JPG

IMG_4072.JPG

Thanks for visiting today!!! Come back tomorrow — there will be a GIVEAWAY BLOG CANDY! 😀

12 Days DIY Christmas 2014: Day 11

I love wreath. And my husband too 🙂 It is Christmas and pine wreath is that the thing of the season.

My wonderful husband got us gorgeous real pine wreath from LLBean last year and it lasted forever! I tell you, that wreath was on our wall for more than 6 months and still smell wonderful.

So, he got it again this year. It is quite pricey but worth it for once in a year 🙂 It came couple days ago and it is up on the wall above our fire place… Ah… And the fresh pine smell fills the living room!

IMG_4050.JPG

Inspires by this gorgeous wreath, I got 2 decoration wreaths for our outside doors. I made it simple by wrapped it with red burlap ribbon and added a red pinwheel ribbon using flower wire. No hot glue gun. Just like that.

IMG_4051.JPG

This is a project you can do under $20! Simple, quick and affordable 🙂

Have a joyful, merry December!