Stencil Sunday | Heat Embossing With Stencils

Hello hello hello… Happy Sunday, crafty friends. Today is my turn again to share my projects for the Stencil Sunday post.

I had so much fun creating these 4 cards using the ARTPlorations Square Stencils, Word Phrase CUTplorations Dies, and WOW! Glitter Embossing Powder. Visit STAMPlorations Blog for more inspirations and to enter the giveaway.

On all those four backgrounds, I use the heat-embossing technique. It is a super fun technique with stencil to try when you want to create bold background. I promise you that you will love the results!!!

First, I applied the anti-static powder on the black cardstock surface, next I taped the stencil on black cardstock. I dabbed the embossing ink all over the cardstock and then removed the stencil. And then I sprinkled the embossing powder on the cardstock, flicked off the extra in the coffee filter, and then heat set the embossing powder with craft heater.

On my first card, I used the All Bloom ARTplorations Stencil and the sentiment is Birthday Bash Phrase Die.

For the second card, I used the Bloom Succulently ARTplorations Stencil and Happy Everything Phrase Die for the sentiment.

For the sentiments on first and second cards, I cut out three layers of white cardstocks and then stacked them together with permanent adhesive to make phrase chipboard. I added the sentiment phrase on these first two cards with the permanent adhesive, too.

For my third card, I used the Petals 3 ARTplorations Stencil. This background is very interesting. I was so surprised with the result of the color. I used the Taffeta Pink embossing glitter but after I heat set the powder, it turned into teal-green color! I don’t know what cause the color changed, but it is pretty cool.

The sentiment is from the Heartfelt Thanks (it was a free 3×4 stamp set offered by Shery a while back). I stamped the sentiment on a white cardstock with Verdant VersaFine Clair pigment ink pad, then I trimmed it into sentiment label. I added it on the card with 3D foam tape.

For my fourth card, I used the Petals 3 ARTplorations Stencil and the sentiment is from one of the Inspirational #1 Clear Stickers.

I added the sticker on a white cardstock and cut it with scissors. I added it on the card with 3D foam tape, too.

Thank you so much for stopping by my blog today! Have a wonderful day!


I link up at:

Swirl Butterfly CAS Cards

Hello hello hello crafty friends… Summer season is also butterfly season. And today, I would love to share these two Swirl Butterfly CAS cards with you.

It is my turn again to share my project at Clear Scraps Blog. This whole month of June, Clear Scraps is collaborating with TapeRunner. Over Clear Scraps blog, I share step-by-step how to create these cards.

On both of these Swirl Butterfly CAS cards, I used the Swirl Butterflies Chipboard Embellishment, 4×6 Brick Wall Stencil, and 4×6 Quarterfoil Stencil.

I taped the Brick Wall stencil directly on top of the white card with the purple tape (washi tape will work well too, just make sure it can be removed without tearing your card). And then, I used the blending brush to apply some of the Vintage Photo Distress Ink on the card.

I stamped one of the sentiments from the STAMPlorations – Noteworthy 2 Stamp Set with the VersaFine Jet Black ink pad on the card using Mini MISTI. After that, I added some white paint splatters on the card background for some extra texture.

I traced one of the butterflies on the back of the yellow glitter paper with pencil. I cut out the paper with micro-tip scissors.

I applied the TapeRunner on the surface of the butterfly. This tape is super sticky and permanent. Then, carefully I lined up the cut out glitter paper on the butterfly and I pressed firmly the paper on it.

I used the same steps to make this second butterfly card. For the butterfly, instead of adding the glitter paper on top of it, I added the orange glitter paper under the butterfly using the TapeRunner.

For the background, I used three Catherine Pooler ink pads (It’s A Girl, Bellini, Melon Ice) that I blended together using the blending brush and the Quarterfoil Stencil.

I stamped the sentiment from Hero Arts Swallow Tail Stamp Set with the VersaFine Jet Black ink pad on the card using Mini MISTI.

I added both of the butterflies on both cards with the TapeRunner, added some trail lines with Sakura Micron Pen, and then I embellished them with some white pearl gems.

Thank you so much for stopping by my blog today. Have wonderful day!

Graciellie Design New Release | Words of Hope

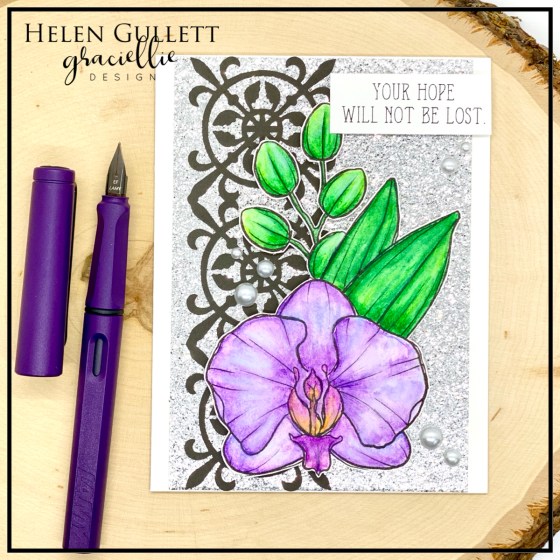
Hello everyone! Thank Goodness It’s Friday!!! And…. I have a card to share with you all with my favorite flower, orchid.

It is the new digital stamp from Graciellie Design, “Words of Hope” Digital Stamp Set.

I like to use the Print-and-Cut feature with Silhouette Studio software to work with digital stamps. But you can work with Gracie’s digital stamps with any Word processing program such as Microsoft Word or Pages.

After I resized the images on the Silhouette Studio, I tuned Print-and-Cut Mark and then I printed the images and sentiment on a white cardstock with Laser Jet printer.

I put the printed cardstock on the cutting mat, loaded it to my Silhouette Cameo 3 machine, then I sent the design to cut. Then, I colored the orchid with Arteza Woodless Watercolor Pencils and waterbrush. I dried the watercolor paint with craft heater.

I also used Gracie’s Magnolia Dreams SVG Cut File for the border background. I cut the design with the Cameo 3 machine too.

I used silver glitter cardstock as the mat background that I added it on the white card wit permanent adhesive. Then, I added the border on top of the card with permanent adhesive glue. I added the watercolored orchid and sentiment label with 3D foam tape.

I embelished the card with some white pearl gems.

GIVEAWAY & SALE

👉🏼 Head over to Graciellie Design Instagram and Facebook for New Release Giveaway. You have many chances to win!!!
👉🏼 All Bundle sets are on sale up to 50%
👉🏼 Get the Letter Board Quotes Digital Set as FREE GIFT with you $10 or more this week!

Thanks for stopping by!!! Have a wonderful weekend.


I link up this card at:

National Iced Tea Day | A beauTEAful Day

Hello hello hello…. HAPPY NATIONAL ICED TEA DAY!!! It is one of my favorite national days! Summer is here and so totally need more iced tea!!!

Today, I am joining the Coffee Loving Cardmakers team celebrating this fun day. At Coffee Loving Cardmakers Blog, you can see more iced-tea projects from the team. And here’s my iced-tea card:

On my card, I used several Super Sponsors products:

I stamped the images and sentiment using VersaFine Onyx Black Ink Pad colored the cup with Arteza Real Brushes. And I used Gemini Junior for all diecutting.

Blog Hop and Giveaway

Let’s grab some iced-tea and join our National Iced Tea Blog Hop!!! Visit and leave comments on Coffee Loving Cardmakers Blog and each Design Team Member blog listed there for a chance to win a $15 Gift Code to any Spring / Summer Coffee Lovers Blog Hop Super Sponsor of your choice! The more you comment, the more chances for you to win! Commenting closes on Saturday, June 13th at 11:59 pm pacific. The winner will be posted on Sunday, June 14th at Coffee Loving Cardmakers Blog.

Thank you so much for stopping by my blog today. I hope you all have a fabulous day!


I also link up at these challenges:

Clear Scraps | Peace Tall and Slim Card

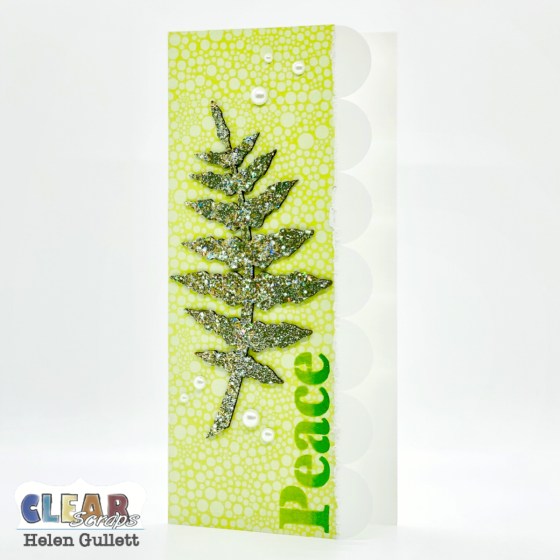
Hello crafty friends! Today, I would like to share with a tall and slim card. It has been a while I haven’t made this type of card and I had fun making this one.

This month, Clear Scraps is having a cross promo with TapeRunner. And today is my turn. On Clear Scraps Blog, I am sharing step-by-step tutorial how to make this Peace tall and slim card using the Fern Branch Chipboard Shape Embellishment and 6″ Fruit of the Spirit Stencil.

I cut out the tall and slim card base using Silhouette Cameo 3. For the background mat, I trimmed a piece of scrapbook paper into 3″ x 8 7/8″ and then I distressed one edge of the paper with my distresser tool (if you don’t have this tool, you can also use scissors, but be very careful!). I added the paper on the card with the TapeRunner.

I taped the 6″ Fruit of the Spirit Stencil on the card using painter tape. I also taped around the word and then using make up sponge, I added the two shades of green VersaFine Clair Pigment Inks on the card. I removed the stencil to clean the ink of the stencil.

I dried the pigment ink on the card with craft heater, then I added some anti-static powder on it. I taped stencil back on the card. Using the Ranger Embossing Dauber, I added the clear embossing ink on the word. I removed the stencil carefully of the card and sprinkled some of the Ranger Fine Clear Embossing Powder on the word, then heat set the powder with craft heater.

I cut the Fern Branch Chipboard Shape Embellishment with scissors of its frame. Using the same embossing dauber, I covered the chipboard surface with the clear embossing ink. I put the inked fern branch on top of a coffee filter, and then sprinkled the WOW! Trio Bundled Up Embossing Glitter (Sage) on it. I poured the whole jar on it to make sure it was covered well with the embossing powder. I tapped off the embossing powder on the coffee filter and I pour the rest of the embossing powder inside the jar.

I preheated my craft heater for couple seconds and then heat set the embossing powder. It was super fun to watch the embossing powder melt on the chipboard. I added the embossed fern branch on the card with the TapeRunner. And then, I embellished the card with some pearl gems I have in my stash.

Hope you like this one and find an inspiration to create today. Thank you so much for stopping by today! Have wonderful day!