CAS Card | Give Thanks With A Grateful Heart

Joy Clair Stamps

Hello everyone… Thanksgiving Day is less dan a month from today. We have Fall/Thanksgiving decoration out and enjoying the Fall weather. We give thanks to the LORD for creating this season!

And today, I have a CAS – Thanksgiving card to share with you all that I created using the new released Color By Faith Stamp Set called Thankful and Blessed, and also the Broken Brick Background Stamp. I am sharing this card at Joy Clair Blog, too.

First, to create the background I stamped the Broken Brick Background Stamp on a white cardstock using Mini MISTI and with Iced Spruce Oxide Ink. After stamping, I added some of the ink on the craft mat, and picked up with wet fan brush and sprinkled some on the cardstock. I dried the background panel, then I trimmed it into 4″ x 5.25″, and I added it on the A2 card (4.25″ x 5.5″) with dries-clead adhesive glue.

I stamped the sentiment on a white cardstock with VersaFine Clair Acorn and VersaFine Clair Summertime using Mini MISTI. I stamped the sentiment bit to the right side more to give the left side some room for the sunflower later. And then, I trimmed it into a banner pennant. I added it on the card with 3D foam tape.

I stamped the sunflower on a white cardstock with CP Midnight Ink Pad and then I colored it with ShinHan Twin Touch alcohol markers. After that, I fussy cut it with micro-tip scissors.

I colored along side of the flower with Micron Brush Black Pen for finishing touch on the flower. And then I added it on the sentiment banner pennant with dries-clear adhesive.

I embellished the card with some of the clear-holographic sequins I have in my stash using dries-clear adhesive glue.

That is my CAS – Thanksgiving card to share with you all today. I hope you all like it and inspire you to create with Joy Clair stamps. Thank you so much for stopping by!

Coffee Loving Cardmakers – CASual Fridays Collaboration Blog Hop

Hello everyone… Happy Friday! Welcome to the collaboration blog hop between Coffee Loving Cardmakers and CASual Fridays. Let’s grab your favorite drink and hopping with us.

These collaboration blog hop starts at Coffee Loving Cardmakers Blog and CAS-ual Fridays Stamps Blog. This blog hop is full of fabulous inspirations from both design teams and also…. PRIZE to win!!! You should have arrived to my blog from my teammate, Erin.

I created 2 cards for this blog hop using the Coffee Talk Stamp Set and the Coffee Cup Fri-Dies Set.

On the first card, I use smooshing technique with Distress Oxide Ink Pads, water, and watercolor paper. And then cut out the cup with the large size cup die. And the I cut out the coffee word out of a scrap watercolored paper I had in stash. For the background, I added some splatters using Cocoa Marabu Art Spray directly on the patterned card from my stash. I added some vitage look to it by adding some of the Vintage Photo Distress Ink with make up sponge. I stamped the sentiment with Hero Art Autum Ombre Ink Pad and finished it with some sequins and twine.

My second card is inspired by these challenges from CAS-ual Fridays:

BLOG HOP and GIVEAWAY

It is time for blog hopping through the design team blogs and don’t forget to leave comments along the way for chances to win one of three $25 Gift Certificates to CAS-ual Friday Stamps! Commenting to close on Friday, October 26, 2018 at 11:55 pm pacific. Winners to be posted on the CAS-ual Fridays Stamps Blog and Coffee Loving Cardmakers Blog on Saturday, October 27th.


Thank you so much for stopping by! Have a fabulous and caffeinated day!!!

A Tribute Blog Hop for Melissa Lane

Hello everyone.. welcome to our special tribute blog hop in memory of our crafty friend, Melissa Lane. It is a hard post to write today but we would love to celebrate her beautiful life today.

Melissa passed away on October 2… She was a sweet friend whom I met through couple design teams. She as kind with her words and encouraging others. She inspired me with her love for God, her family, gardening, and cardmaking. On her blog, you can see lots of beautiful works and stories behind them. I am going to miss her a lot… My prayers are for her family that may God comfort her husband, children, and parents with the love and hope in Christ Jesus.

This tribute blog hop for Melissa starts at STAMPlorations Blog where you can see more inspirations form the team. And I created these two sympathy cards with some butterflies on them becuase Melissa loved butterflies.

I used Trendy Butterflies 2 Stamp Set to create the background and the sentiment is from the Fond Expressions Stamp Set. On the left card, I did stamping and watercoloring, and on the right one I used alcohol inks and gold foil sheet along with the stamping.

You Are In My Prayers

For the first card, I stamped the butterflies on the left side of a cardstock with VersaFine Onyx Black on the right side of a watercolor paper. I trimmed the paper into 4″ x 5.25″. I freely painted the butterflies with Sakura Koi Watercolor Paints. I added some splatters with black watercolor paints. I dried the watercolor paper craft heater, and then I stamped the sentiment on it with VersaFine Onyx Black ink pad using my Mini MISTI. I added the finished panel on a dark blue card using dries-clear adhesive glue.

You Are In My Prayers

On the second card, I added some on the alcohol inks on a glossy photo paper using the felt applicator and alcohol blender. I slightly tap the ink on the paper to get the softer look on it. I let it sit to dry for a couple of minutes, and then I added the Deco Foil Gold Sheet on the paper that is still bit tacky to get the gold-ish marble look on it. I let it dried completely before stamping step.

I stamped the butterflies using the VersaFine Clair ink pads. I am so happy to see that they work great on glossy paper, too. I trimmed the 4″ x 6″ photo paper into 4″ x 5.25″ and added it on a light blue card base with Scrapbook Adhesive EZ Runner Grand. I stamped the sentiment on white cardstock with VersaFine Clair – Purple Delight, and then trimmed it into a sentiment banner. I added it on the card with 3D foam tape for extra dimension.

We would like to invite you all to join us in celebrating her life by creating a butterfly card in her memory. You may blog about the card you make as a tribute to her or not, but either way, please add your card to Melissa’s Butterfly Gallery at the end of this tribute post.

Oh and… when you use any STAMPlorations products on your projects, you can also link it up at STAMPlorations Neverending Anything Goes Challenge:

Before you all go…. Here’s a special discount code for you to use at STAMPlorations Store: STAMPGIRLHELEN to save 20% OFF on all your order.

We are so thankful for all of you and Thank you again for being here to celebrate Melissa’s life with us.

Have a wonderful day!


I link up at these challenges:

Anything Goes week 356-357

When Joy Clair Meets Therm O Web

Hello everyone… This week is an exciting week at Joy Clair because we are teaming up with Therm O Web to share projects using products from both companies.

And today I am sharing 3 projects at Joy Clair blog today. Visit both Joy Clair Blog and Therm O Web Blog for more inspirations this week and also to enter the giveaway.

On my first two (2) cards today I use two of the Color By Faith Bible Journaling Stamp Sets, Living Water and Heartfelt Sympathy together with these products form Therm O Web: Deco Foil Clear Toner Sheets, Deco Foil Toner Sheet, Gina K. Designs Fancy Foils, and Gold Glitter Dust Photo Frame Assortment. And… I tell you.. they are so much fun to create with!!!

For the backgrounds, I use both Endless Leaves Clear Toner Sheet and Toner Sheet. First, I added one of the Dazzling Orange Fancy Foil Sheets on the matte side of the clear toner sheet and run it through my laminating sheet with the carrier paper.

And then after peeling off the foil sheet… I saw the negative is also so beautiful… So, I added it on a piece of the Toner Sheet and run it through the laminating machine again… and ta-da! Another foiled background! Super cool.

I used the foiled clear sheet on this first card. I trimmed it slightly smaller than the card base. I used dries-clear adhesive to add the acetate plastic on the card.

I stamped the sentiment from the Living Water stamp set with VersaFine Clair Nocturne on a white cardstock using Mini MISTI. I added one of the Gold Glitter Dust Photo Frames. I trimmed the extra white cardstock, then wrapped some of the natural burlap twine around the frame, and added it on the card with 3D Foam Tape.

I stamped the deer twice on a watercolor paper with VersaFine Onyx Black and colored them with Leisure Arts Watercolor Pencils and waterbrush. I dried it with craft heater and then fussy cut them with micro tip scissors. I added on of them on the card with dries-clear adhesive and 3D foam tape.

On my second card, I use the foiled toner sheet. I cut it using one of the Elegant Stitched Dot Edge Dies. I added the burlap sheet first on the card with dries-clear adhesive glue. I wrapped the foiled sheet with natural burlap twine and then I added it on the card with the same adhesive glue.

I stamped the sentiment on a white cardstock using Mini MISTI with VersaFine Clair Pinecone Ink Pad. I trimmed the cardstock into a sentiment banner and I added it on the card with adhesive glue.

I added the other watercolored deer on this card with dries-clear adhesive.

My third card is a Christmas card using The Reason Stamp Set, Deco Foil Gold Transfer Sheet, Deco Foil Liquid Adhesive, Deco Foil Adhesive Pen, and Kuretake Gansai Tambi Watercolor paints.

First, I added some of the Deco Foil Liquid Adhesive on the stamp using make up sponge, then I stamped it on the watercolor paper with Mini MISTI. After that, I added the Gold Transfer Sheet on top of the glue, using my bone folder, I press the foil on the glue. I repeat the step for bold result. This is where Mini MISTI comes handy!

After stamping and foiling the sentiment, I added clean water all over the watercolor paper, and then I added the watercolor paint. I dried the watercolor paint with craft heater. The gold foil resist the watercolor paint.

I added some splatters using white acrylic paint, Metallic Finetec Gold Palatte paints, and Gold Foil. To add the gold foil on the card,  I used the Deco Foil Adhesive Pen to add some dots randomly on the background panel and then added the Gold Transfer Sheet on each dot. I added the finished background on a white card with adhesive glue.

For the angels, I stamped them using the same step I did with the sentiment. After stamping and foiling, I colored them with Metallic Finetec Gold Palatte paints, dried them with craft heater, and fussy cut them with micro-tip scissors. I added the angles on the card with 3D foam tape.

And… that’s all my projects to share with you… As you can see… I had so much fun making projects with Joy Clair Stamps and Therm O Web products. I am pretty sure that I will be making more!

Thank you so much for stopping by today. I hope you all enjoy the post and be inspired. Have wonderful day!


I link up at these challenges:

Anything Goes Week 356-357

Simon Says: Starry Night

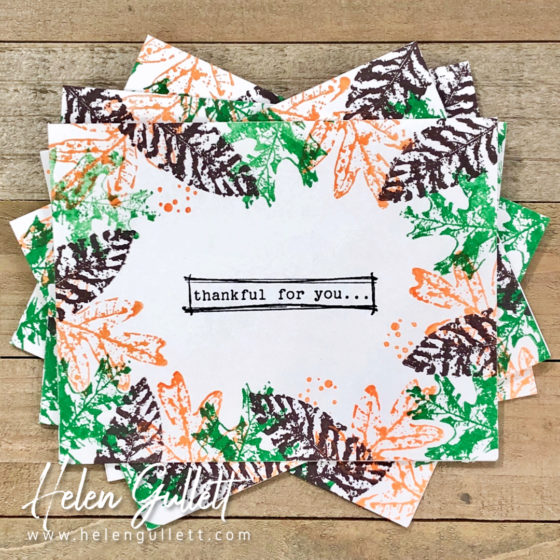
Project Thursday | One Layer Thanksgiving Card Set

Hello everyone… Thanksgiving is about 5 more weeks from today! There are many ways we can express our gratitude to those who have been kind to us. One way is sending a thank you cards.

For the Project Thursday at Precious Remembrance Blog today, I have a set of One Layer Thanksgiving Cards. They are quick and easy to make. On these cards, I use the Fall Colors Stamp Set. It is a beautiful stamp set and perfect for this season. And I use the VersaFine Clair – Green Oasis, VersaFine Clair – Summertime, and VersaFine Clair – Pinecone.

This type of card is perfect for mass-produce in short time for sure. Over their blog, I share more details and how I created them.

Thanks for stopping by today. I hope you all have a fabulous day!