Watercolor Wreath Christmas Card

9 days ’till Christmas! Can you believe that? I am a little behind with sending Christmas cards this year… but almost finish today! 😀 A lot of writing for sure, but my oldest is helping with writing cards this year, that is fun 🙂   Making Christmas cards are super fun for us. And today, I would love to share a card I made to play along with Curtain Call Inspiration Challenge, Candy Cane.

I am inspired by the Candy canes and wreath. I used couple retired products from CTMH for this card. Oldie but still goodie 🙂

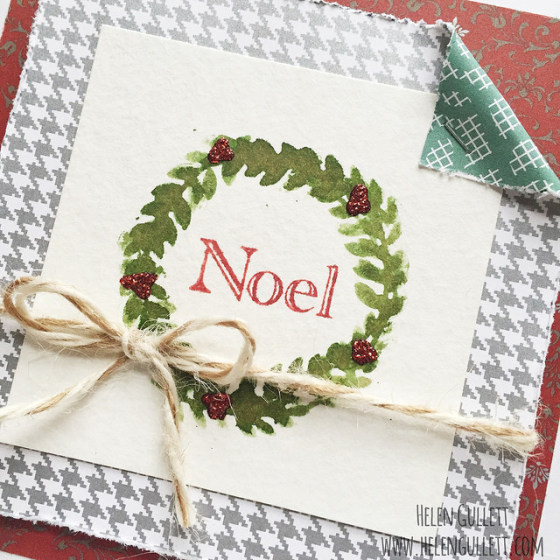
For the base layers, I used Sparkle and Shine paper packet that one side of the pattern is candy cane and the other is polkadots. I cut 2 sizes of squares, 5.25″ (candy cane side) and 4.75″ (polkadots side) for base the layers. Then on a watercolor paper (3.25″ x 3.25″), I stamped the wreath branch with Chocolate exclusive ink pad and sprayed with some water. And then I stamped the berry dots with Ruby exclusive ink pad and sprayed with some water, for some watercolor effect. With the same technique, I stamped the sentiment in the middle of the wreath with Olive exclusive ink pad.

noel-winter-berry-wreath-curtaincall2014-hmg

I added some natural baker’s twine and some pearl adhesive gems on it. Then added it on the card using 3D foam adhesive. I love how the watercolor effect using dye inks turned out 🙂

Noel - Watercolor Winter Berry Wreath

Thanks for stopping by today! Have a merry December!

Christmas Cards: Watercolored, Distressed and Blinged

I am working on my last Christmas cards this week… I thought I had enough but so thankful to know that there were some new friends and mission partners God has brought into our life this year! We are rejoicing!

Today I would love to share couple of the cards I made using some retired products from Close To My Heart. Both cards are 5.75″ square.

Card 1 I used some of Sparkle and Shine paper packet and I distress the edge of the second layer paper using Edge Distresser. I really like this distress tool, easy to use and quick way to create torn edges 🙂 Then I tucked one of the corners and secured it with Mini Stapler.

noel-wreath-card-sss-1a

On a square piece of watercolor paper I stamped the wreath using Olive exclusive ink pad. The wreath I actually created using a leaf brach from It’s The Little Things set (SOTM November 2014). I drew a thin circle as guide and stamped the leaf repeatedly after I sprayed with little water to give the watercolor effect.

With the same technique, I stamped the Noel sentiment in the center of the wreath using Ruby exclusive ink pad. Then I embellish with some Studio G red glitter glue, I found it at Walmart scrapbooking area. I set it aside to dry completely before I added the twine and glued it on the card.

noel-wreath-card-sss-1b

This card I link up this card at Virginia’s View Challenge #10, All Things Distressed

And this second card, I link up at Simon Says Stamp Wednesday Challenge, Bling It On. I used the same products and technique to create this card. A little bit different design.

noel-wreath-card-sss-2a

For the wreath, I only stamped the leaves one layer and then I added some red adhesive gems on the wreath. Then I add the baker’s twine on top of the card.

noel-wreath-card-sss-2b

Thank you for stopping by today and have a merry December!!!

Holiday Coffee Lovers Blog Hop: Coffee Cup Gift Card Holder & Ornament

Have I told you that I love coffee, hot cocoa, and chocolate?  Adding to that… I love making cards, too. That is enough reason to say that I love Holiday Coffee Lovers Blog Hop over Amy’s blog. Too much love… LOL!

IMG_3536

Today I would love to share my second project I link up at this merry blog hop:

IMG_4070.JPG

This is a coffee cup gift card holder and ornament. I found this cutting file on Silhouette Design Store from A Little Hut. After I cut the shapes using Silhouette Cameo, I stamped the peppermint and heat embossed them. On the sleeve, I stamped the leaves with Olive Exclusive Inks Pad. Then stamp the sentiment banner on a piece of White Daisy cardstock with Ruby Exclusive Inks Pad. The stamp set I used is Merry, Merry (C1591). Final touch I added some Bitty Sparkle.

I added a piece of twine for an option to hang it as ornament after the recipient remove the gift card 🙂

Here’s what it looks inside with a slot where you can put the gift card.

IMG_4073.JPG

Here are couple close ups….

IMG_4071.JPG

IMG_4072.JPG

Thanks for visiting today!!! Come back tomorrow — there will be a GIVEAWAY BLOG CANDY! 😀

12 Days DIY Christmas 2014 and Holiday Coffee Lovers Blog Hop

My mom loves baking cookies in this special season. She bakes yummy cookies, put them in little plastic jars for gifts and to sell them too. I used to help her with the packing and decorating the jars. How I miss her in this holidays.

I love making gifts that I feel it is a way to share the joy with others. And in the last 2 Christmas-es I made gifts for families and friends. This Christmas I make this cute little 3D coffee mug using my Silhouette Cameo.

IMG_4043.JPG

I found this 3D hot cocoa/coffee mug cutting file is from Lori Whitlock on Silhouette Design Store. Open the file at Silhouette Studio software, no need to resize, ungroup the shapes for cutting with different papers. First I cut Silhouette chipboard for the base and the hexagon for the bottom of the mug. Next I cut Snowhaven paper for the layering and the handle. I love the pattern from Snowhaven paper packet! They are just cool for Christmas 🙂

Putting this mug is very easy. I used Xyron 1.5″ sticker maker for the rectangles and added them on the chipboard base (before fold it). Then, using glue dots secure the handle from inside. Fold the mug using on the score lines. For the base, I used double sided tape, I found it easier than liquid glue. Add the base from inside the mug and another one from the outside bottom. Final touch, I added some Slate Exclusive Inks Pad using a sponge dauber along the edges.

I filled this mug with a bag of hot cocoa and some sweet goodies 🙂 Then I tied it up using the twine from Doodlebug Designs Christmas assortment twine. I cut the tag using Silhouette Cameo, stamped it with one of the sentiments from Be Jolly stamp set (CTMH Hostess Reward) using Ruby Exclusive Inks Pad. Oh I found this cute little Christmas light bulb in my stash and added little bling there 🙂

I link this project at a HUGE blog hop I ever joined, Holiday Coffee Lovers Blog Hop hosted by amazing Amy Tsuruta.

IMG_3536

And not just blog hopping, but you can link up your projects at Amy’s blog, hopping around the link ups (some of them offering prizes individually on their blog!) and WIN these amazing prizes from sponsors!

And the sponsors are:

●●Sponsorship prizes are eligible via random draw from linked hop participants only●●

17Turtles Veronica Zalis Chris Franco
Add a Little Dazzle Butterfly Reflections Ink Color Cast Designs
Create a Smile Hero Arts Kraftin’ Kimmie
Kreative Kymona Latina Crafter Neat & Tangled
Newton’s Nook Pickled Potpourri Designs Poppystamps
Reverse Confetti Stamp Academy Stamp Simply Ribbon Store
STAMPlorations SugarPea Designs Sweet ‘n Sassy
The Alley Way Stamps Two Paper Divas Verve Stamps
Whole Wild World Your Next Stamp Paper Smooches

An Early Valentine Card Idea

IMG_3993.JPG

Welcome to Joyful Stars December 2014 Blog Hop! Today I am joining a group of Close To My Heart Consultants blog hop showcasing new products from the new idea book, Seasonal Expressions 1.

If you arrive from Nancy’s blog, you are at the right place 🙂 This blog hop starts at Joyce’s blog where you also can find the full list of the blogs.

My project I wanna share today is a Valentine card. I know it is too early 🙂 but I hope this can inspire you to start planning for that special day.

IMG_3994.JPG

Supplies I used from Close To My Heart:
– White Daisy Cardstock (1385)
– Heartstrings Paper packet (X7193B)
– Brushstrokes stamp set (C1608)
– Forever In My Heart stamp set (C1604)
– Exclusive Inks Stamp Pads: Thistle, Cranberry, Pixie
– VersaMark Watermark Ink Pad (Z891)
– Ranger Silver Embossing Powder (Z2067)
– Craft Heater (Z555)
– 1″ x 3 1/2″ My Acrylix Block (Y1002)
– 2″ x 2″ My Acrylix Block (Y1003)
– Distress Sanding Kit (Z1294)
– 3D Foam Tape (Z1151)

I added some stitching using my Brother sewing machine to add some extra accent to it.

Thanks for visiting my blog today and your next hope is Stephanie to see what she has created for you 🙂

Have a fun blog hopping!