Christmas Card Project Has Began

Christmas Card Project has began!

I have a goal this year I would like to send out handmade cards to all our church family, friends and family members. This is a big goal for me because we usually sent out at least 200 Christmas cards every year! That is a lot! But I would like to try 🙂

And here are the first 2 cards I made today:

Merry Christmas | http://helengullett.com/?p=7378 #ctmh #snowhaven #handmadecard #cardmaking #papersmooches #michaels #christmascard #creatingjoyfully

This first card is inspired by a sketch challenge at Paper Smooches SPARK Challenge for their Designer Drafts Challenge this week. Paper I used is Snowhaven paper packet (CTMH) and the snow embellishments are from Recollections (Michael’s store). The sentiment is from the Christmas Sampler stamp set (Paper Smooches) that I stamped and heat embossed using Ranger™ Princess Gold Embossing Powder.

The second card is a one layer card. I used pencil to draw a triangle to make the shape of a tree and stamped the Fa-La from Christmas Sampler stamp set (Paper Smooches) inside the triangle using Pear Exclusive Inks Stamp Pad (CTMH). And I finished it with some Christmas embellishments I got from Michael’s a while ago and some Studio G Glitter pen to make the garland.

Fa La La Christmas Tree | http://helengullett.com/?p=7378 #ctmh #snowhaven #handmadecard #cardmaking #papersmooches #michaels #christmascard #creatingjoyfully

I will post more Christmas Cards that I make to share with you and hopefully they can inspire your to create more 🙂 So, what is your plan for this Christmas? Will you make handmade cards, or buying, or printing photo cards?

Have a Terrific Thursday!

Joyful Birthday Banner Card

I got my Fuse Tool and Card kit from We R Memory Keepers early this week. This kit is now only sold by HSN. SUPER EXCITED to try this fuse tool after hearing some review from my crafty friends 🙂

And today I had a chance to make this cute birthday card to celebrate one of my favorite stamp & die companys. Neat and Tangled is celebrating their 3rd Birthday.

HAPPY BIRTHDAY, Neat and Tangled! Wish you the best all year long!
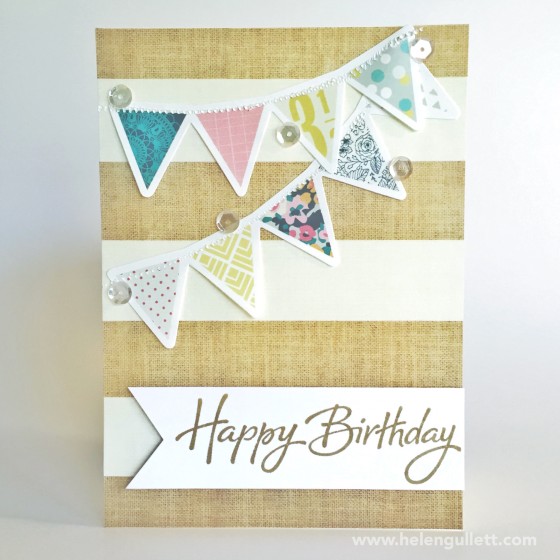
Joyful Birthday Banner Card | http://helengullett.com/?p=7361 #CTMH #WRMKFuse #WRMK #neatandtangled #HSN #creatingjoyfully #DIY #cardmaking #handmadecard

I am inspired by one of the Card Examples come with the kit:

Fuse Card Kit Examples | Joyful Birthday Banner Card | http://helengullett.com/?p=7361 #CTMH #WRMKFuse #WRMK #neatandtangled #HSN #creatingjoyfully #DIY #cardmaking #handmadecard

Using the fuse tool I made this card in less than 5 minutes and with no kids around because the fuse tool is very HOT. Background and banners are fusable papers. This fusable papers are smooth and have to be very careful when want to fuse them together, they could be very slippery. Simply add the banner on the background paper and fuse them one by one, overlapping them little bit.

Joyful Birthday Banner Card | http://helengullett.com/?p=7361 #CTMH #WRMKFuse #WRMK #neatandtangled #HSN #creatingjoyfully #DIY #cardmaking #handmadecard

Then I added some crystal clear sequins from Neat and Tangled using Glue Dots Mini. I got them from as a little gift from them when I ordered stamps and dies 🙂 Their sequins have beautiful colors and thick, check them out and you’ll love them, too.

For the sentiment, I stamped the sentiment from Joyful Birthday stamp set (LOVE this set from CTMH!) using Desert Sand Exclusive Inks™ Stamp Pad on a piece White Daisy cardstock, then using Non-Stick Micro-Tip Scissors I cut the dove tail. I used 3D Foam tape to add the banner sentiment on the card.

Joyful Birthday Banner Card | http://helengullett.com/?p=7361 #CTMH #WRMKFuse #WRMK #neatandtangled #HSN #creatingjoyfully #DIY #cardmaking #handmadecard

In my opinion, for making this fusable papers into cards, they are not strong enough and too slippery and smooth to write on. There are couple tricks. First, if you still want to make the card using this fusable paper, you can add a piece of white cardstock inside the card for writing space and make it stronger. Second trick which is what I do for my cards, that I use White Card as the base. After decorating the fuse paper with embellishments, I add it on the front card using glue runner. I almost covered the whole card with glue to make sure they glued together.

And my card is done 🙂 Hopefully you’ll like it as much as I like making it! Have a wonderful Wednesday!

=============================================

Supplies:

  • Fuse Tool Card Kit (We R Memory Keepers, sold by HSN)
  • Clear Sparkle Sequins (Neat and Tangled)
  • Joyful Birthday Stamp Set (CTMH)
  • White Daisy Cardstock (CTMH)
  • Dessert Sand Ink Pad (CTMH)
  • My Acryclix 2″ x 3 1/2″ Stamping Block (CTMH)
  • White card base (Hobby Lobby)
  • Mini Glue Dots (Glue Dots Adhesive)
  • 3D foam tape (Scotch)
  • Micro Tip scissors (ek Tool)
  • Glue runner (Elmer)

=============================================

I link up this card at:

Little Tangled Challenge #59 – Birthday

Creative Spark Link Party #69

Creative

Inspire Me Monday – week 190

Psalm 16:5

Psalm 16:5 | #RelentlessStudy #HelloMornings #Godismine #digitaldoodling #digitalhandwriting #madewithpaperbyfiftythree #madewithpencilbyfiftythree #fiftythree #createanywhere

LORD, you alone are my inheritance, my cup of blessing. You guard all that is mine. (Psalms 16:5)

This is the Psalm of David. He sang to the LORD what was in his heart. He sang who God was for Him. He declared what God has done and what He would do for him and his people, Israel.

This is the same song I sing this morning declaring the God is mine.

He is my portion.

He is my only inheritance.

He is my cup of blessings.

And only God who can fill my cup overflowing.

I am so thankful for the study I have been doing with HelloMornings group since 3 years ago. The ladies at my group bless me. They are my accountability to overcome my weakness.

He is working in everyone’s life to change them to be like him. And yes, He is working in my life for real through this group of ladies at HelloMornings.

We just started our first week of six-week study in the book of Judges. If you are looking for accountability, group to study God’s word together and grow together, you can CLICK HERE to know more about HelloMornings and to register.

First Day Of School

Today is the day! The day when my Big Girl is going back to school. She is super excited for today, her first day of school as First Grader. For the whole week… literally whole week, she kept saying, “I cannot wait for my first day of school!”

Honestly, my husband and I do not want our daughters to grow so fast, but growing is part of life. They will keep growing physically and spiritually. We cannot stop the process, but we can enjoy and always be thankful for what God has been doing in their lives.

Today, we celebrate their milestone. The Big Girl is going to First Grade and The Little Girl is starting her Toddler or so called Pre-K school at home with me.

We are thankful.

1st Day Chalkboard Sign

Supplies: Chalkboard Sign (Walmart), Chalkboard marker (CTMH), White Chalk (Walmart)

First Day of First Grade

First Day Sign

Supplies: Black Cardstock (Walmart), White Color Pencil (American Crafts)

First Day of Toddler School

And a little gift for her new teacher, too

DIY Gift for Teacher

Supplies: Framed Stamp Set (CTMH), Teacher Appreciation (CTMH), White Daisy Cardstock (CTMH), Cranberry Ink Pad (CTMH), Honey Ink Pad (CTMH), Pear Ink Pad (CTMH), Topiary Ink Pad (CTMH), Pacifica Ink Pad (CTMH), Gypsy Ink Pad (CTMH), Baker’s Twine, Sharpie Markers, Tin Can, 3D Paper Flower (Silhouette Design Store)

How’s your first day of the week? 🙂

====================================================

Link Up at:


Inspire Me Monday Week 190

Dear Creatives
Dear Creative Link Up Party week 158

Happy Everything – Watercolor Note Card Set

I love making handmade cards. I always love stamping technique. Also, I like watercoloring the images using watercolor pencils because I can just color them like regular pencil colors, wet it with some water, and done. But I still do not have enough confidence to do more with watercolor paints.

My daughters are my inspirations to step out of my comfort zone about painting. I love seeing them just paint whatever on their papers and pouring out their imaginations on the paper. They just do it. And as always I LOVE their arts!

Watercolor Note Card Set by Helen Gullett | www.helengullett.com

Today I found out that makingn cards with watercoloring with watercolor paint directly on watercolor paper is fun. This is because I am taking classes at Big Picture Classes, one of them is where I learned to make these cards. The class is actually about making gifts for Mother’s Day but I think it is more than just a gift for Moms. They are great gifts for anyone 🙂 What I like with all the classes at BPC is that the teachers will walk you step by step with video and also they are very helpful.

At this class, the teacher showed how to paint the cards and adding some extra on them with stamping and letterpressing technique.

Supplies I used to make these cards are:

  • Happy Everything stamp set (CTMH)
  • Feathers stamp set (CTMH)
  • Finding the Words (CTMH)
  • Black Exclusive Inks Stamp Pad (CTMH)
  • My Acrylix Stamping blocks (CTMH)
  • Heavy weight Watercolor paper (Handmade Modern, Target) or you also can use watercolor cards
  • Pearlescent Watercolor
  • Big and Wide Flat brushes
  • Water.

What I learn this week is that fear won’t get you and me anywhere, but willing to try and taking the first step forward will get us somewhere.

Did you try something new today? Share with me in the comment box, I’d love to know!

Have an amazing weekend!

=============================

This post I link up at Friendship Friday Blog Party  & Social Media Boost Week 186.